Categories
Microsoft

Vulnerability scanning for MS17-010 / 4013389 / WannaCry using OpenVAS in a Docker Container

For instructions on how to install Docker on Ubuntu see my post here: https://www.cb-net.co.uk/linux/installing-docker-on-ubuntu-16-04-lts-16-10/

Updated 31/05/17 to include Ping Host and NMAP (NASL wrapper) tests due to feedback around reliability of results without these tests enabled.

Following on from my previous post around MS17-010 / 4013389 vulnerability patching assurance I thought I’d share a more robust scanning and reporting tool that is simple to deploy and use, OpenVAS. The deployment/ configuration of which is made even simpler through the availability of a Docker Image.

Assuming you have an Ubuntu 16.04 server/ client with the docker engine installed, use the following commands to get OpenVas up and running:

docker pull mikesplain/openvas:9

docker run -d -p 443:443 --name openvas mikesplain/openvas:9

# *** Alternatively *** use the host machines IP address rather than the docker0 interface/ a NAT'd address as above.

docker run -d --net host -p 443:443 --name openvas mikesplain/openvas:9
Next, browse to https://<machine IP> and login, using default credentials of admin / admin :

Now, from the top menu, browse to Configuration > Scan Configs

Click the “sheep” (clone) button next to empty

Hit the spanner icon at the top of the window:

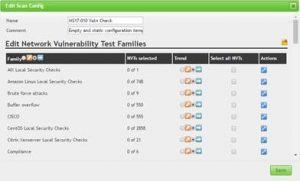
Name the Scan Config “MS17-010 Vulnerability Check” or something else meaningful:

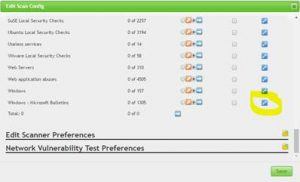
Scroll down to “Windows : Microsoft Bulletins” and hit the spanner icon next to this:

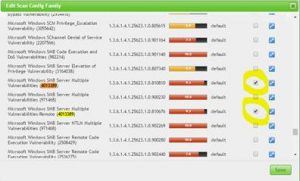
Search for 4013389 (the relevant MS ID), enable all instances for the scan and click save:

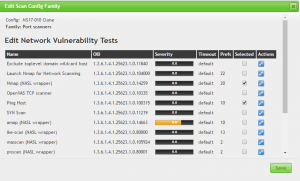
As per comments via this post, also enable the Port Scanners | Ping Host and NMAP (NASL wrapper) tests.

Click Save, then click save again.

Now browse to: Scans > Tasks

Click the “Pink Wand” icon: New > Advanced Task Wizard

Name the task and select the new scan config you just created. Specify IP, subnet etc you want to scan. Hit “Create” to start the scan for this specific vulnerability.

Check the reports as the scan progresses, anything identified needs to be patched, or hardened/ isolated if it is older than those O/S editions that this patch was released for.

Happy hunting…

Categories
Microsoft

MS17-010 Vulnerability Checking with PowerShell and Nmap

There have been several MS17-010 PowerShell scripts that have emerged over the last week or so, I wanted to call out a couple in particular, aimed at assurance/ understanding vulnerability within a network rather than the remediation/ clean-up.

The first uses Nmap to identify individual IPs/ hostnames that are vulnerable to MS17-010 exploit: https://gist.github.com/iwikmai/65b8a5b882e782d78fc5f466dfd2cde4

Using Nmap is important as simply installing the patch itself without a reboot is not enough to protect against this vulnerability. This script uses Nmap to confirm that this exploit is no longer available on a per-target basis, rather than simply looking for an installed hotfix.

The second script is good for checking that machines have the patch itself installed: https://github.com/kieranwalsh/PowerShell/blob/master/Get-WannaCryPatchState/Get-WannaCryPatchState.ps1

No doubt you’ll come across scripts that help you deploy the patch and even decrypt/ clean-up WannaCry itself – certainly lots of interesting reads in recent days.

Categories
Linux

Upgrading a Docker-based, Duo MFA enabled deployment of Guacamole 0.9.11-incubating to 0.9.12-incubating

For a fresh, Duo MFA-enabled installation of Guacamole, follow instructions outlined here: https://www.cb-net.co.uk/linux/deploying-guacamole-duo-mfa-via-docker-containers-ubuntu/

To get guacamole deployed using docker containers, on Ubuntu 16.04, see my other post here: https://www.cb-net.co.uk/linux/enabling-duo-dual-multi-factor-authentication-mfa-for-guacamole-docker/

In this post I cover how to update your duo MFA-enabled, docker-based guacamole 0.9.11-incubating deployment to 0.9.12-incubating.

This guide assumes you have a working 0.9.11-incubating deployment, comprised of:

  • A guacd container named guacd
  • A guacamole/guacamole container names guacamole
  • A mysql container named guac-mysql
  • A pass-through volume that contains duo MFA extension and guacamole.properties file on the docker host in the following location: /var/docker/config/guacamole/

Finally, upgrading 0.9.11-incubating to 0.9.12-incubating does not require a database update, so this is not included below.

# Stop and remove the previous guacd/ guacamole instances
sudo docker stop guacamole
sudo docker stop guacd
sudo docker rm guacd
sudo docker rm guacamole

# Pull latest container images for guacd/ guacamole
sudo docker pull guacamole/guacd
sudo docker pull guacamole/guacamole

# Pull latest duo MFA extension
cd /var/docker/config/guacamole/extensions/
wget http://apache.mirrors.tds.net/incubator/guacamole/0.9.12-incubating/binary/guacamole-auth-duo-0.9.12-incubating.tar.gz
tar zxvf guacamole-auth-duo-0.9.12-incubating.tar.gz
mv guacamole-auth-duo-0.9.12-incubating/guacamole-auth-duo-0.9.12-incubating.jar /var/docker/config/guacamole/extensions/

# Ensure you clean-up older versions!

# Create/ start the new guacd/ guacamole containers
sudo docker run --name guacd -d guacamole/guacd

sudo docker run --name guacamole --link guacd:guacd --link guac-mysql:mysql \
-e MYSQL_DATABASE='guacamole' \
-e MYSQL_USER='guacamole' \
-v /var/docker/config/guacamole:/config \
-e GUACAMOLE_HOME=/config \
-e MYSQL_PASSWORD='<your password>' \
-d -p 8080:8080 guacamole/guacamole

# Set to auto-start on docker restart
sudo docker update --restart=always guacd
sudo docker update --restart=always guacamole
Categories
Linux

Using Let’s Encrypt with an NGINX Docker Container (plus bye-bye StartSSL!)

Updated June 2017 : reflecting move to certbot/certbot container.

I ran into an issue this week with my StartSSL certificates deployed on my personal lab/ infrastructure. It turns out the Google stopped trusting this CA with a recent release of Chrome, and that this had been on the cards for a while: https://security.googleblog.com/2016/10/distrusting-wosign-and-startcom.html

So, with this in mind, I decided to make the move to Let’s Encrypt.

My Environment

  • Ubuntu Server 16.04
  • Docker containers for:
    • Nginx (used as a reverse proxy) configured to redirect all HTTP traffic to HTTPS
    • A test website published at: test.cb-net.co.uk
    • A Guacamole instance, published at: remote.cb-net.co.uk

The fact that I was using docker containers would make this little more “interesting” or challenging.


Using Let’s Encrypt Certificates in a Docker Container

I came across the following post which I used as a foundation for the method below: https://manas.tech/blog/2016/01/25/letsencrypt-certificate-auto-renewal-in-docker-powered-nginx-reverse-proxy.html

Much is common in terms of the solution/ scripts.


NGINX Container/ Config

NGINX volumes passed-through to container from the docker host (you’ll use these later):

  • Config folder: /var/docker/volumes/nginx/conf.d
  • SSL certificate root:/var/docker/volumes/nginx/ssl
  • WWW root folder: /var/docker/volumes/nginx/www/ : Create a folder per domain – i.e.
    • /var/docker/volumes/nginx/www/test.cb-net.co.uk
    • /var/docker/volumes/nginx/www/remote.cb-net.co.uk

Create the directory structure on your docker host above (change domains to match your needs):

sudo mkdir -p /var/docker/volumes/nginx/conf.d
sudo mkdir -p /var/docker/volumes/nginx/www/test.cb-net.co.uk
sudo mkdir -p /var/docker/volumes/nginx/www/remote.cb-net.co.uk
sudo mkdir -p /var/docker/volumes/nginx/ssl

Now, re-create the NGINX container to include the config, root and the SSL folders:

sudo docker pull nginx
sudo docker run --name nginx -p 80:80 -p 443:443 \
-v /var/docker/volumes/nginx/ssl/:/etc/nginx/ssl/ \
-v /var/docker/volumes/nginx/conf.d/:/etc/nginx/conf.d/ \
-v /var/docker/volumes/nginx/www/:/var/www \
-d nginx

Modifying your HTTP to HTTPS Redirect Config

Skip this section if you have a new NGINX container/ no SSL in-place today.

Leaving a redirect all to HTTPS configuration in place will cause the Let’s Encrypt certificate request to fail (specifically the domain validation piece).

You need to modify the NGINX configuration to create a root folder, per domain, that Let’s Encrypt will use for domain validation. All other traffic will be redirected to HTTPS.

You’ll need to do this for each published site/ resource.

# Redirect http to https
 server {

 listen 80;
 server_name test.cb-net.co.uk;

#### Required for letsencrypt domain validation to work
 location /.well-known/ {
 root /var/www/test.cb-net.co.uk/;
 }

return 301 https://$server_name$request_uri;
 }

Ensure you allow port 80 traffic to hit your web server for the request to work.


Requesting the Certificate

We’ll use a docker image for this piece as well.

You can see below, I specify the SSL folder we created and mapped into the NGINX container:

  • /var/docker/volumes/nginx/ssl

Be sure to change the domain name, web root path and email address used in the request.

# Pull the docker image
sudo docker pull certbot/certbot

# Request the certificates - note one per published site
sudo docker run -it --rm --name letsencrypt \
 -v "/var/docker/volumes/nginx/ssl:/etc/letsencrypt" \
 --volumes-from nginx \
 certbot/certbot \
 certonly \
 --webroot \
 --webroot-path /var/www/test.cb-net.co.uk \
 --agree-tos \
 --renew-by-default \
 -d test.cb-net.co.uk \
 -m [email protected]

sudo docker run -it --rm --name letsencrypt \
 -v "/var/docker/volumes/nginx/ssl:/etc/letsencrypt" \
 --volumes-from nginx \
 certbot/certbot \
 certonly \
 --webroot \
 --webroot-path /var/www/remote.cb-net.co.uk \
 --agree-tos \
 --renew-by-default \
 -d remote.cb-net.co.uk \
 -m [email protected]

If successful, the new certificate files will be saved to: /var/docker/volumes/nginx/ssl/live/<domain name>

You will find four files in each domain folder:

  • cert.pem: Your domain’s certificate
  • chain.pem: The Let’s Encrypt chain certificate
  • fullchain.pem: cert.pem and chain.pem combined
  • privkey.pem: Your certificate’s private key

Pulling it all Together

We now need to configure NGINX to use these certificates, modify your config file as below, adding a new location to both HTTP and HTTPS listeners – these lines will need to be set for each published resource/ certificate as requested above, within the relevant server definition in your NGINX configuration file.

I have only included a single server definition in the config file example below, you can simply copy/ paste to create additional published resources/ modify as necessary.

# Redirect http to https
 server {
 listen 80;
 server_name remote.cb-net.co.uk;

#### Required for letsencrypt domain validation to work
 location /.well-known/ {
 root /var/www/remote.cb-net.co.uk/;
 }

return 301 https://$server_name$request_uri;
 }

# Guacamole Reverse Proxy HTTPS Server
server {
listen 443 ssl;
server_name remote.cb-net.co.uk;
rewrite_log on;

ssl_certificate /etc/nginx/ssl/live/remote.cb-net.co.uk/fullchain.pem;

ssl_certificate_key /etc/nginx/ssl/live/remote.cb-net.co.uk/privkey.pem;

ssl_trusted_certificate /etc/nginx/ssl/live/remote.cb-net.co.uk/fullchain.pem;

#### Required for letsencrypt domain validation to work
 location /.well-known/ {
 root /var/www/remote.cb-net.co.uk/;
 }
# Only needed for guacamole
location / {
 proxy_pass http://<guacamole instance>:8080/guacamole/;
 proxy_redirect off;
 proxy_buffering off;
 proxy_set_header X-Real-IP $remote_addr;
 proxy_set_header X-Forwarded-For $proxy_add_x_forwarded_for;
 proxy_set_header Upgrade $http_upgrade;
 proxy_set_header Connection $http_connection;
 proxy_cookie_path /guacamole/ /;
 access_log off;
 }
}

# Create additional server blocks for other published websites.

Once modified/ saved, restart the nginx instance:

sudo docker restart nginx

Automating the Renewal

These certificates will only last 90 days, so automating renewal is key!

Create the script below as /etc/cron.monthly/letsencrypt-renew.sh

#!/bin/sh

# Pull the latest version of the docker image
 docker pull quay.io/letsencrypt/letsencrypt

# Change domain name to meet your requirement
docker run -it --rm --name letsencrypt \
 -v "/var/docker/volumes/nginx/ssl:/etc/letsencrypt" \
 --volumes-from nginx \
 certbot/certbot \
 certonly \
 --webroot \
 --webroot-path /var/www/test.cb-net.co.uk \
 --agree-tos \
 --renew-by-default \
 -d test.cb-net.co.uk \
 -m [email protected]

# Change domain name to meet your requirement
docker run -it --rm --name letsencrypt \
 -v "/var/docker/volumes/nginx/ssl:/etc/letsencrypt" \
 --volumes-from nginx \
 certbot/certbot \
 certonly \
 --webroot \
 --webroot-path /var/www/remote.cb-net.co.uk \
 --agree-tos \
 --renew-by-default \
 -d remote.cb-net.co.uk \
 -m [email protected]

# Chnage "nginx" to the nginx container instance
docker kill --signal=HUP nginx

Now enable execute permissions on the script:

chmod + x /etc/cron.monthly/letsencrypt-renew.sh

Finally, you can test the script:

./etc/cron.monthly/letsencrypt-renew.sh

Once executed, your published sites should reflect a certificate with a created time stamp of just a few seconds after running the script.

Categories
WordPress

Enabling WordPress SSL using Cloudflare Flexible SSL

Enabling SSL within WordPress is not a simple task if you rely upon the “flexible SSL” offering from CloudFlare. You will end up with SSL infinite redirects and will likely be unable to get into your admin interface without editing config files.

Getting this to work though, with the help of a plugin, can be relatively straight-forwards.

First, you need to install the following plugin on your WordPress installation: https://wordpress.org/plugins/cloudflare-flexible-ssl/

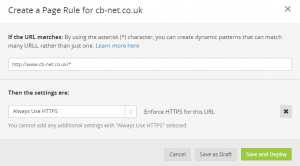
Next, within the CloudFlare configuration for your domain, browse to “Page Rules” – you want to create a new Page Rule:

Enter http://www.<your domain>.<name>/* – for example http://www.cb-net.co.uk/* and then, from the drop down box, select “Always use HTTPS” – finally, click “Save and Deploy:”

That’s it.. browse to your site’s URL and confirm the traffic is automatically redirected to HTTPS.

You do not have to change the WordPress config – to re-enable HTTP access remove the CloudFlare rule.

Categories
Linux

Enabling Duo Dual / Multi-Factor Authentication (MFA) for Guacamole Docker

Updated 12/04/17; reflected availability of 0.9.12-incubating version of guacamole.

Updated 12/02/18; reflected 0.9.13-incubating version of guacamole.

*** This guide assumes you have guacamole up and running, see here if you do not! ***

First, you’ll need to register for a Free Duo account, go to: https://duo.com/

Create a new “Auth API” application: Dashboard > Applications > Protect an Application > Web SDK

  • Scroll down, under Settings and change the name to “Guacamole,” or something of your choice.
  • Copy out the following information (you’ll need this for the guacamole.properties file):
    • Integration Key
    • Secret Key
    • API hostname

Finally, generate a duo “application key” on your docker host – note you do not have to input this anywhere on your Duo configuration.

dd if=/dev/random count=1 | sha256sum

Now from your docker host we will create a skeleton extensions directory and guacamole.properties file that will be passed through to the guacamole docker image. Don’t worry, we’ll only add the Duo-specific config/ extension files here, the docker images will sort the rest out for us!

We will create this skeleton home directory under: /var/docker/config/guacamole/

# From Docker HOST execute these commands

cd ~/
mkdir -p /var/docker/config/guacamole/extensions/

wget http://apache.mirrors.tds.net/incubator/guacamole/0.9.13-incubating/binary/guacamole-auth-duo-0.9.13-incubating.tar.gz

tar zxvf guacamole-auth-duo-0.9.13-incubating.tar.gz

mv guacamole-auth-duo-0.9.13-incubating/guacamole-auth-duo-0.9.13-incubating.jar /var/docker/config/guacamole/extensions/

cd /var/docker/config/guacamole
vi guacamole.properties

### Duo MFA Config
duo-api-hostname: <as per duo config>
duo-integration-key: <as per duo config>
duo-secret-key: <as per duo config>
duo-application-key: <generate using command above>

# Now save/ close the text file

Finally, we’ll now drop and recreate the guacamole docker image with Duo support – note this will stop access / any running sessions. Note how we pass through the config folder and then define it as a path within the container which GUACAMOLE_HOME then uses.

Be sure to verify syntax of this command – i.e.

  • Database name
  • Database user account/ password
  • guacd and mysql linked docker container names
  • Volume paths that are passed-through to the container
docker stop guacamole
docker rm guacamole

docker run --name guacamole --link guacd:guacd --link guac-mysql:mysql \
-e MYSQL_DATABASE='guacamole' \
-e MYSQL_USER='guacamole' \
-v /var/docker/config/guacamole:/config \
-e GUACAMOLE_HOME=/config \
-e MYSQL_PASSWORD='<your password>' \
-d -p 8080:8080 guacamole/guacamole

The guacamole container should now be started and you should be able to login/ assign MFA to your guacamole account.

Be sure to reset your browser cache as otherwise you will be presented with an error when logging on.

Categories
Linux

Hey, where did my VM LAN connectivity go?!

I was over-due my monthly patching on my KVM/QEMU host based on Ubuntu 16.10, so decided to diligently update packages and reboot last night… at least that was the plan.

After the host came back up I noted that all of my KVM-based workload lost network connectivity. Host <> VM was working, but VM<>VM and LAN<>VM were failing.

I confirmed the bridge config (br0) had survived the upgrade, that the bridge was up, and in fact showed the VMs being attached…  so I started to dig deeper.

I then came across this guide on bridge setup: https://wiki.libvirt.org/page/Networking#Debian.2FUbuntu_Bridging – the main stand-out was this section:

Finally add the ‘/etc/sysctl.conf’ settings

net.bridge.bridge-nf-call-ip6tables = 0
net.bridge.bridge-nf-call-iptables = 0
net.bridge.bridge-nf-call-arptables = 0

Closely followed by:

To ensure that the bridge sysctl settings get loaded on boot, add this line to ‘/etc/rc.local’ just before the ‘exit 0’ line. This is a work around for Ubuntu bug #50093.

Also to stop Circumventing Path MTU Discovery issues with MSS Clamping

 *** Sample rc.local file ***
 /sbin/sysctl -p /etc/sysctl.conf
 iptables -A FORWARD -p tcp --tcp-flags SYN,RST SYN -j TCPMSS  --clamp-mss-to-pmtu
 exit 0

I had done neither of these steps previously, and the host had been running for a few months/ various updates without issue.

Now, getting rc.local working on Ubuntu 16.10 was… “interesting” to say the least, and even when working, rc.local executes too early for this to be a “clean” fix. I’ll share my steps, and eventual workaround, but it isn’t pretty!

The Workaround

Create service file for rc-local :

 sudo vi /etc/systemd/system/rc-local.service

Contents as below:

[Unit]
Description=/etc/rc.local Compatibility
ConditionPathExists=/etc/rc.local
#After=network.target

[Service]
type=forking
ExecStart=/etc/rc.local start
TimeoutSec=0
StandardOutput=tty
RemainAfterExit=yes
SysVStartPriority=99

[Install]
WantedBy=multi-user.target

Now create the rc.local file:

vi /etc/rc.local

Contents as below (keep the header and the “sleep 10” line, without this the script will fail):

#!/bin/sh -e
#
# rc.local
#
# This script is executed at the end of each multiuser runlevel.
# Make sure that the script will "exit 0" on success or any other
# value on error.
#
# In order to enable or disable this script just change the execution
# bits.
#
# By default this script does nothing.

sleep 10
/sbin/sysctl -p /etc/sysctl.conf
#echo "0" > /proc/sys/net/bridge/bridge-nf-call-iptables
#echo "0" > /proc/sys/net/bridge/bridge-nf-call-ip6tables
#echo "0" > /proc/sys/net/bridge/bridge-nf-call-arptables

iptables -A FORWARD -p tcp --tcp-flags SYN,RST SYN -j TCPMSS --clamp-mss-to-pmtu
exit 0

Enable execution on the rc.local file:

chmod +x /etc/rc.local

Now reload-daemons, enable rc-local and then, when finished, reboot:

systemctl daemon-reload
systemctl enable rc-local


Categories
Linux

Ubuntu Linux and OpenVPN Client, using UFW to force traffic via VPN tunnel interface

Updated 24/07/17; included startup configuration to ensure automatic docker container connectivity via VPN post reboot/ startup.

First, you’ll need to obtain your “.ovpn” configuration file from your VPN provider. Find and replace <config file> with the name of the file excluding the file extension.

There are two stages to this guide:

  1. VPN Client Connection/ Configuration
  2. UFW Firewall Configuration (to ensure traffic can only use VPN and prevent DNS Leak)

If you are using docker containers be sure to check the considerations at the end of this article.

VPN Client Connection/ Configuration

Prepare the configuration file:

# Disable IPv6
echo "#disable ipv6" | sudo tee -a /etc/sysctl.conf
echo "net.ipv6.conf.all.disable_ipv6 = 1" | sudo tee -a /etc/sysctl.conf
echo "net.ipv6.conf.default.disable_ipv6 = 1" | sudo tee -a /etc/sysctl.conf
echo "net.ipv6.conf.lo.disable_ipv6 = 1" | sudo tee -a /etc/sysctl.conf
sudo sysctl -p

# Move config file to /etc/openvpn
mv <config file>.ovpn /etc/openvpn/<config file>.conf

# Create .secrets file
echo '<username>' >> /etc/openvpn/.secrets
echo '<password>' >> /etc/openvpn/.secrets
chmod 600 /etc/openvpn/.secrets

# Modify config file
vi <config file>.conf

# Ensure you have no other auth-user-pass lines defined
auth-user-pass .secrets

# Add redirect-gateway to force traffic down TUN interface
redirect-gateway

# Add DNS server update script execution to config file
script-security 2
up /etc/openvpn/update-resolv-conf
down /etc/openvpn/update-resolv-conf

# Save/close config file

We’ll now configure OpenVPN client to automatically connect to this VPN interface on startup:

# Edit /etc/default/openvpn, un-comment AUTOSTART="all" then save/close 
vi /etc/default/openvpn

# Start / enable openvpn service at boot
sudo systemctl start openvpn
sudo systemctl enable openvpn

Confirm the VPN tunnel is up and public IP is that of the VPN provider:

# Look for a tun0 interface, if found you are connected!
ifconfig

# Check public IP is "hidden"/ different vs. machine not on the VPN
curl ipinfo.io/ip

UFW Firewall Configuration

We’ll configure UFW to allow only allow outbound traffic to the VPN provider (“tun0” in this example) interface.

First we must enable forwarding:

# Set the DEFAULT_FORWARD_POLICY policy to ACCEPT
vi /etc/default/ufw

Next we’ll configure the necessary UFW rules to facilitate the outbound traffic to the VPN provider, but block everything else. You’ll need to change:

  • <VPN Server IP> to IPv4 address as-per the “remote xx.xx.xx.xx” line in your OpenVPN configuration file.
  • <port> to the remote OpenVPN port  (usually 1194 or 443)
  • <LAN subnet> to network/subnet that represents your network – i.e. 172.16.0.0/16.
# Defaults
ufw default deny incoming
ufw default deny outgoing

# Allow SSH from local LAN
ufw allow from <LAN subnet> to any port 22

# UFW rule to ensure we only hit the VPN
ufw allow out to <VPN server IP> port <VPN server port>
ufw allow out to <LAN subnet>
ufw allow out on tun0

# Enable the firewall
ufw enable

If DNS lookups on the client fail you’ve missed the configuration lines from your OpenVPN configuration file, as above, you want to force DNS lookups over the VPN otherwise you’re leaking DNS requests, reducing the privacy value of your VPN.

# Add DNS server update script execution to config file 
script-security 2 
up /etc/openvpn/update-resolv-conf 
down /etc/openvpn/update-resolv-conf

Considerations when using Docker Containers

If you want your docker containers to sit behind the VPN, ensure you use the–net=host” argument. As per: https://docs.docker.com/engine/userguide/networking/default_network/container-communication/

If your containers have no internet connectivity at startup it is likely because docker started before the VPN connection was established. Credits for this solution here.

sudo mkdir /etc/systemd/system/docker.service.d/
sudo touch /etc/systemd/system/docker.service.d/depend.conf
sudo vi /etc/systemd/system/docker.service.d/depend.conf

# New conf file should only contain lines below
[Unit]
Requires=sys-devices-virtual-net-tun0.device
After=sys-devices-virtual-net-tun0.device

# Now save the file and exit vim

sudo systemctl daemon-reload

# Test container connectivity following a reboot

Docker’s forward rules permit all external source IPs by default.

By default containers will use the docker0 interface and thus when your VPN goes down, they will still have external/ internet access. This statement only applies when using the default docker0 interface, not when binding the container to the “host” interface.

My experience shows that the default docker forward rule associated with the docker0 interface  overrides any UFW rule (i.e. as defined above).

You can test container connectivity using the commands below:

# Test there is NO connectivity from container when VPN is down
systemctl stop openvpn
docker exec -it <container_name> /bin/bash
ping 8.8.8.8

# Test this IS connectivity from container when VPN is up
systemctl start openvpn
docker exec -it <container_name> /bin/bash
ping 8.8.8.8
Categories
Linux

Running guacamole from a Docker Container on Ubuntu 16.04 LTS / 16.10

Replaced by updated post / article: https://www.cb-net.co.uk/linux/deploying-guacamole-duo-mfa-via-docker-containers-ubuntu/

I’ve been looking at how I can move some/ all of my QEMU virtualised workloads to docker containers – the main drivers behind this being:

  • Reducing the administrative overhead of updating an additional operating system
  • Reducing the compute overhead of running an additional operating system on top of the host O/S

I also looked at whether this solution wold run in a docker-enabled Ubuntu 16.04 LXD container and, whilst the mysql and guacamole images downloded, the guacd image failed with an “operation not permitted error” meaning I was unable to use the image inside an LXD container.

I use Apache guacamole for remote access to my infrastructure and, on finding there were guacamole containers for the client and server elements, I thought I would look to move this workload from a dedicated Ubuntu Server 16.04 LTS Virtual Machine to a docker container.

This guide assumes you have installed docker as outlined here: http://www.cb-net.co.uk/linux/installing-docker-on-ubuntu-16-04-lts-16-10/

Downloading / Deploying the Container

Be sure to define/ update the commands below with:

  • A new mysql root user password (find and replace <root password> )
  • A new mysql guacamole user password (find and replace <guac user password> )

We will now create/ configure and start three containers:

  1. A mysql database instance: guac-mysql
  2. A guacamole-server container: guacd
  3. A guacamole-client container: guacamole

# Pull the guacamole (and related) docker images

sudo docker pull guacamole/guacd
sudo docker pull guacamole/guacamole
sudo docker pull mysql 

# Create script to prepare MySQL Database

docker run --rm guacamole/guacamole /opt/guacamole/bin/initdb.sh --mysql > initdb.sql

# Make a scripts folder to pass-through to container

mkdir /tmp/scripts
cp initdb.sql /tmp/scripts

# Create/ start mysql instance

docker run --name guac-mysql -v /tmp/scripts:/tmp/scripts -e MYSQL_ROOT_PASSWORD=<root password> -d mysql:latest 
history -c

# Create mysql db, user and prepare mysql instance for guacamole

docker exec -it guac-mysql /bin/bash

mysql -u root -p'<root password>'
CREATE DATABASE guacamole;
CREATE USER 'guacamole' IDENTIFIED BY '<guac user password>';
GRANT SELECT,INSERT,UPDATE,DELETE ON guacamole.* TO 'guacamole';
FLUSH PRIVILEGES;
quit

cat /tmp/scripts/initdb.sql | mysql -u root -p'<root password>' guacamole
history -c

# Now ctrl-d to exit docker container shell # Start guacd

docker run --name guacd -d guacamole/guacd

# Start guacamole client

docker run --name guacamole --link guacd:guacd --link guac-mysql:mysql \
-e MYSQL_DATABASE='guacamole' \
-e MYSQL_USER='guacamole' \
-e MYSQL_PASSWORD='<guac user password>' \
-d -p 8080:8080 guacamole/guacamole

# Harden tomcat, as-per https://www.owasp.org/index.php/Securing_tomcat

sudo docker exec -it guacamole /bin/bash

sed -i 's/redirectPort="8443"/redirectPort="8443" server="" secure="true"/g' /usr/local/tomcat/conf/server.xml

sed -i 's/<Server port="8005" shutdown="SHUTDOWN">/<Server port="-1" shutdown="SHUTDOWN">/g' /usr/local/tomcat/conf/server.xml
 
rm -Rf /usr/local/tomcat/webapps/docs/
rm -Rf /usr/local/tomcat/webapps/examples/
rm -Rf /usr/local/tomcat/webapps/manager/
rm -Rf /usr/local/tomcat/webapps/host-manager/
 
chmod -R 400 /usr/local/tomcat/conf

You can now browse to http://<docker host IP>:8080/guacamole/ and login using the credentials guacadmin/guacadmin.

Managing the Containers

Replace “guac-mysql” below with the other container names used above to manage guacd, guacamole or guac-mysql independently:

# Start a container

sudo docker start guac-mysql

# Stop a container

sudo docker stop guac-mysql

# Hard-stop a container

sudo docker kill guac-mysql

# Restart (and auto-update) a container

sudo docker restart guac-mysql

# List all running containers

sudo docker ps

# List all running AND non-running containers

sudo docker ps -a

# Remove a container

sudo docker rm guac-mysql

# Remove the mysql docker image

sudo docker rmi mysql

# Review logs for container

sudo docker logs -f guac-mysql
Categories
Linux

Running Plex from a Docker Container on Ubuntu 16.04 LTS / 16.10

Updated 24/12/16 : Plex now have an official Docker container, this guide has been updated to use this.

Updated 28/03/17 : Automatic updates not working on your container when restarting? Make sure you specify the correct tag for the docker image. If you are a plexpass subscriber pull the “plexinc/pms-docker:plexpass” image, if not pull the “plexinc/pms-docker:public” image.

Updated 22/05/17: Issue with NFS volumes not being mounted when docker service started led to media being unavailable without container/ docker restart. Changing volumes passed-through to container to include “:shared” resolves this issue.

I’ve been looking at the merits of moving my Plex server workload from a dedicated KVM/QEMU virtual machine to a docker container on the host server itself. The reasons for doing this were as below:

  • Reducing the administrative overhead of updating an additional operating system
  • Reducing the compute overhead of running an additional operating system on top of the host O/S

An additional benefit of running Plex in this manner is that on restarting the container the latest version of Plex is automatically pulled and deployed, making updates in future very, very simple.

This guide assumes you have installed docker as outlined here: http://www.cb-net.co.uk/linux/installing-docker-on-ubuntu-16-04-lts-16-10/

Downloading / Deploying the Container

To download and deploy the container you will need:

  • A storage location for the Plex configuration directory – this is persistent, i.e. it will survive containers being deleted/ recreated. The size of this will vary based on how large your media library is. On libraries with several terabytes of media you looking at tens of gigabytes of storage.
  • One or multiple mount points/ folder locations that contains your media (in this example there are multiple “-v” definitions that represent paths to TV shows, movies etc. you can have as many of these as you want)

Note below, I have used the “plexinc/pms-docker:plexpass” docker image to ensure automatic updates on container restart work. If you are not a plexpass subscriber ensure you change this to “public.” If you do not specify a tag, automatic updates on the container will not work.

# Pull the linuxserver/plex docker image
sudo docker pull plexinc/pms-docker:plexpass

# Get a Plex Claim Token by going to this URL and replace <CLAIM> below
# https://www.plex.tv/claim/

# Create a new linuxserver/plex docker container
docker create \
--name plex \
--net=host \
-e TZ=Europe/London \
-e PUID=1000 -e PGID=1000 \
-e PLEX_CLAIM="<CLAIM>" \
-v <path to config>:/config \
-v <path to music>:/data/music:shared \
-v <path to tv series>:/data/tvshows:shared \
-v <path to movies>:/data/movies:shared \
-v <path to home videos>:/data/homevideos:shared \
plexinc/pms-docker:plexpass

# Configure docker container to always update
docker update --restart=always plex

# Start the plex container
docker start plex

You’ll notice I have defined volumes as “:shared” which enables NFS volumes passed-through to the container to be mounted after the container starts without issue.

You can now browse to http://<docker host IP>:32400 and login using you plex.tv account.

If you want to use the PlexPass version of Plex modify the server settings and restart the container using the command shown below.

Managing the Plex Container

# Start the plex container
sudo docker start plex
# Stop the plex container
sudo docker stop plex
# Hard-stop the plex container
sudo docker kill plex
# Restart (and auto-update) the plex container
sudo docker restart plex
# List all running containers
sudo docker ps
# List all running AND non-running containers
sudo docker ps -a
# Remove the plex container (note you can redploy and will not lose anything/ config wise)
sudo docker rm plex
# Remove the linuxserver/plex docker image
sudo docker rmi linuxserver/plex
# Review logs for plex container
sudo docker logs -f plex