Categories
DevOps

Using Docker Compose with MySQL/ WordPress

The following Docker Compose can be used to create persistent MySQL and WordPress instances, save the compose within its own directory on your Docker host and execute the project using the command:

docker-compose up -d

The WordPress environment will be available on http://<IP address of Docker Host>:8082 – published port can be changed by modification of the compose file.

Compose file – note you will need to provide secure MySQL and WordPress DB passwords:

version: '2'

services:
 wp-mysql:
 image: mysql:latest
 volumes:
 - wp_mysql:/var/lib/mysql
 ports:
 - "3306:3306"
 restart: always
 environment:
 MYSQL_ROOT_PASSWORD: "<mysql_root_password>"
 MYSQL_DATABASE: wordpress
 MYSQL_USER: wordpress
 MYSQL_PASSWORD: "<wordpressdb_password>"

wp-wordpress:
 depends_on:
 - wp-mysql
 image: wordpress:latest
 volumes:
 - wp_data:/var/www/html/wp-content
 ports:
 - "8082:80"
 restart: always
 environment:
 WORDPRESS_DB_HOST: wp-mysql:3306
 WORDPRESS_DB_USER: wordpress
 WORDPRESS_DB_PASSWORD: "<wordpressdb_password_as_above>"

volumes:
 wp_mysql:
 wp_data:

To stop the containers brought up by compose relating to this project:

docker-compose down

To stop the containers and cleanup volumes (thus losing data contained within them):

docker-compose down --volumes
Categories
DevOps

Installing Docker CE on Ubuntu 16.04.3 LTS / 17.10

Use the commands below to install Docker CE and enable “br_netfilter” (bridge netfilter module) to ensure that ICC functions as expected on Ubuntu 16.04.3 LTS and 17.10:

# Install and configure Docker CE
sudo apt-get update
sudo apt-get install \
 linux-image-extra-$(uname -r) \
 linux-image-extra-virtual

sudo apt-get install \
 apt-transport-https \
 ca-certificates \
 curl \
 software-properties-common

curl -fsSL https://download.docker.com/linux/ubuntu/gpg | sudo apt-key add -

sudo add-apt-repository \
 "deb [arch=amd64] https://download.docker.com/linux/ubuntu \
 $(lsb_release -cs) \
 stable"

sudo apt-get update
sudo apt-get install docker-ce
sudo systemctl enable docker


# Enable br_netfilter/ iptables filtering on Docker bridge interfaces
sudo vi /etc/modules-load.d/bridge.conf:

   br_netfilter

sudo vi /etc/sysctl.d/bridge.conf:

   net.bridge.bridge-nf-call-ip6tables = 1
   net.bridge.bridge-nf-call-iptables = 1
   net.bridge.bridge-nf-call-arptables = 1

sudo sysctl net.bridge.bridge-nf-call-iptables=1
sudo sysctl net.bridge.bridge-nf-call-ip6tables=1
sudo sysctl net.bridge.bridge-nf-call-arptables=1

sudo systemctl restart docker
Categories
DevOps

Docker Container Network Isolation

TL:DR: when testing Docker with “–icc=false” on Ubuntu Server 16.04.3 I found that br_netfilter was required but not configured by default. Even when enabled, I found that the Docker Host physical network was not protected against container breakout. Testing with IP Masquerade disabled addressed Docker Host physical network  security, however, with ICC and IP Masquerade disabled it was just as “easy” to manage the environment with “–iptables=false” and a firewall script.

I recently ran through an exercise where I was testing Docker Container Network Isolation in a lab environment – this involved reviewing the impact of disabling ICC, IP Masquerade and Docker’s interaction with IP tables itself. The scenarios I was trying to provide isolation for are as follows:

  • Docker Container access to Docker Containers within the same Docker network
  • Docker Container access to other Docker Containers in different Docker network
  • Docker Container access to Docker host
  • Docker Container access to Docker host physical network/ other hosts
Categories
Alexa

Alexa and Plex… so close!

TL:DR : The Alexa skill may well require a manual Port Forwarding rule/ Plex Media Server configured to playback music on the Echo device itself. FLAC content (at time of writing) will randomly stop mid-song, or at the end of a song but fail to progress to the next track. MP3 content does not exhibit this issue. Either use MP3 media, or don;t expect to play music via your Echo device (for now).

Update 13/01/18: Plex have released a statement on these issues, available here: https://forums.plex.tv/discussion/303556/update-on-playback-issues – in effect, the audio stream stopping issues should be fixed soon. The Need for NAT loopback/ hairpin is also being worked on.

Like “millions” of others over the Christmas period we obtained a generation 2 Echo device, with the (initial) sole purpose of replacing the DAB radio that struggles for reception in our kitchen.  Having set the device up I started looking at what integrations there were for devices/ services we consume at home – Plex is the centre of our home Television and Music entertainment, so this seemed like an obvious candidate. On paper the Alex Plex skill enables (amongst other things):

  • Control of RasPlex devices, playing video/ audio content on any device (all of our Plex clients are Raspberry Pi 3’s running RasPlex)
  • The ability to play music via the Echo device itself

The pre-requisites are fairly simple – your Plex Media server must be configured for “remote access,” and you have to install/ configure the Alex Plex “skill.”  I’ve been a long-term user of Plex on a variety of devices, so I knew remote access was in-place and working well. Sounds simple enough right…? Well, yes and no.

Enabling the skill was simple enough, but on instructing Alex to “ask Plex to play music by Incubus” I received a response stating that Alexa was “playing music by Incubus” but then silence. I tried this several times, all to no avail. RasPlex device control worked immediately, and I was able to play music without issue on these devices, instructing Alexa to “ask Plex to play music by Incubus on Kitchen TV” for example. Output from the Echo itself just would not work.

I headed to the Plex and Reddit/plex forums and sifted through a ton of similar issues. Eventually I got the damn thing playing music on the Echo itself by performing two changes:

  • Enabling “ASUS” Loopback NAT (changed from “Merlin”) on my Internet router
  • Configuring a manual Port Forwarding rule for Plex to port 34200/ configuring my plex server to use Port 32400 externally

Now I was presented with a further issue, music stopped “randomly” in the middle of a track. I could resume playback with a simple “Alexa, resume” command, but needless to say 30 – 60 seconds at a time, this got frustrating pretty quick. After a raft of testing I found that my older, MP3 based content would play through, without issue, but FLAC media would not. Again, trawling forums, I found others who had come to similar conclusions. Something appears to go wrong with transcoding media for the Echo. Workaround for now, use MP3 media or simply don’t use the Echo for music playback.
Categories
ConfigMgr

OSD Wizard Updates (0.95 release)

I’ve worked my way through a series of additional features for OSD Wizard (a ConfigMgr/ SCCM Task Sequence front-end/ modern HTA) this week – namely the introduction of run-time “modes” – Default, Set-Description, ExportOU, Test. With these modes you can now:

  • Set AD Computer Account description mid-Task Sequence using OSD Wizard/ Web Service as opposed to using a separate script with RunAs credentials
  • Perform a compatible OU export using the OSD Wizard script itself (and automate/ schedule this if so desired), rather than performing this manually
  • Fully test OSD Wizard outside of a Task Sequence environment (without the need for the SMS TS Environment COM Object) – including the ability to spoof platform information/ properties.

Grab a copy of the latest release here: https://gitlab.com/chrismbradford/osd-wizard

Categories
ConfigMgr

Introducing OSD Wizard – A PowerShell Front-End / HTA for ConfigMgr Task Sequences

When I first started working with SCCM/ ConfigMgr a few years ago I ran into several issues with upstream teams trying to deploy Task Sequences to devices that were untested (i.e. there were no drivers), power was not plugged in, the user supplied hostname was duplicated in target domain etc. This generated unnecessary Incidents, and delays in getting devices out to users. I became increasingly frustrated at the lack of ConfigMgr built-in capabilities to address these issues, so I turned to vbScript to write a HTA / front-end to address these issues. vbScript is now, several years later, a dying technology, so over time I have re-written the vbScript/ HTA in PowerShell, leveraging WPF and XAML to generate a user interface.

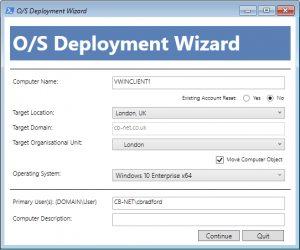
OSDWizard UI

OSD Wizard is a PowerShell script with a WPF/ XAML-based UI built for use within System Center Configuration Manager (SCCM / ConfigMgr) Task Sequences – it has two key purposes, the second of which is optional:

  1. Reduce “human error” factors during early stages of Operating System Deployment
  2. Enable location (network) derived automation for multi-language environments

You can read through the details of the project, download and review the source code (and even contribute!) via GitLab, here: https://gitlab.com/chrismbradford/osd-wizard

Categories
ConfigMgr

ConfigMgr Windows 10 Enterprise 1703 Stuck at “Just a moment”

I ran into an issue when testing Windows 10 Enterprise 1703  in the lab, when deploying via ConfigMgr Current Branch – essentially after image deployment the machine would reboot and just show a blue screen with “just a moment.”

I came across this post which led to the solution – a modification to the Unattend.xml:

<?xml version="1.0" encoding="utf-8"?>
<unattend xmlns="urn:schemas-microsoft-com:unattend">
    <settings pass="oobeSystem">
        <component name="Microsoft-Windows-Shell-Setup" processorArchitecture="amd64" publicKeyToken="31bf3856ad364e35" language="neutral" versionScope="nonSxS" xmlns:wcm="http://schemas.microsoft.com/WMIConfig/2002/State" xmlns:xsi="http://www.w3.org/2001/XMLSchema-instance">
            <OOBE>
                <HideEULAPage>true</HideEULAPage>
                <HideLocalAccountScreen>true</HideLocalAccountScreen>
                <HideOEMRegistrationScreen>true</HideOEMRegistrationScreen>
                <HideOnlineAccountScreens>true</HideOnlineAccountScreens>
                <HideWirelessSetupInOOBE>true</HideWirelessSetupInOOBE>
                <NetworkLocation>Work</NetworkLocation>
                <ProtectYourPC>1</ProtectYourPC>
                <SkipMachineOOBE>true</SkipMachineOOBE>
                <SkipUserOOBE>true</SkipUserOOBE>
            </OOBE>
        </component>
        <component name="Microsoft-Windows-Shell-Setup" processorArchitecture="x86" publicKeyToken="31bf3856ad364e35" language="neutral" versionScope="nonSxS" xmlns:wcm="http://schemas.microsoft.com/WMIConfig/2002/State" xmlns:xsi="http://www.w3.org/2001/XMLSchema-instance">
            <OOBE>
                <HideEULAPage>true</HideEULAPage>
                <HideLocalAccountScreen>true</HideLocalAccountScreen>
                <HideOEMRegistrationScreen>true</HideOEMRegistrationScreen>
                <HideOnlineAccountScreens>true</HideOnlineAccountScreens>
                <HideWirelessSetupInOOBE>true</HideWirelessSetupInOOBE>
                <NetworkLocation>Work</NetworkLocation>
                <ProtectYourPC>1</ProtectYourPC>
                <SkipMachineOOBE>true</SkipMachineOOBE>
                <SkipUserOOBE>true</SkipUserOOBE>
            </OOBE>
        </component>
    </settings>
    <cpi:offlineImage cpi:source="wim:c:/temp/install.wim#Windows 10 Enterprise Evaluation" xmlns:cpi="urn:schemas-microsoft-com:cpi" />
</unattend>


Categories
Linux

Creating a Windows Server 2012 R2 KVM/ QEMU Guest

You’ll need to obtain the latest virtio-win-<version>.iso file and copy this to you host, alongside the Windows Server 2012 R2 ISO. Get the former from here: https://fedorapeople.org/groups/virt/virtio-win/direct-downloads/archive-virtio/

Both of these ISO’s will be mounted on the guest as you’ll have to manually load the virtstor drivers during Windows setup.

Use the code below to create the guest machine, this assumes you have copied ISO images to /var/kvm/images/iso:

sudo virt-install \
--name vwinguest1 \
--ram 2048 \
--disk path=/var/kvm/images/vm/vwinguest1.qcow2,size=16,bus=virtio,format=qcow2 \
--disk /var/kvm/images/iso/win2012r2.ISO,device=cdrom,bus=ide \
--disk /var/kvm/images/iso/virtio-win.iso,device=cdrom,bus=ide \
--vcpus 1 \
--os-type windows \
--os-variant win2k12r2 \
--network bridge=br0,model=virtio \
--graphics vnc,listen=0.0.0.0 \
--noautoconsole \
--accelerate \
--console pty,target_type=serial

Now open KVM and connect to the host IP on port 5901 (or the next free VNC port if you have other guests running with VNC graphics on this host).

Use the code below to auto-start the VMs on host start-up:

sudo virsh autostart vwindc1
Categories
DevOps

Periodic Table of DevOps Tools

Whilst not exhaustive (a difficult task in the world of DevOps tools), I came across this really useful interactive info-graphic on DevOps tools: https://xebialabs.com/periodic-table-of-devops-tools

Categories
Linux

How to make a Linux systemd service wait for a VPN interface before starting

Like me, you may have a requirement for a service to start only once a VPN interface is established.

This is quite easy to achieve by extending the systemd unit file for the service in question. In this example, based upon Ubunutu 16.04 but portable to other systemd-based distros, I will focus on docker.service, but the configuration is applicable to any service – provided you change the relevant folder/ filenames, in bold, appropriately.

For a service other than docker.service, find and replace “docker.service” with the relevant service name you want to wait for VPN connectivity.

You also need to identify the systemctl device id for you VPN connection.

# Identify the VPN interface name - commonly "tun0"
ifconfig

# Find the systemctl interface name based upon output from command above. In my case this output "sys-devices-virtual-net-tun0.device"
systemctl | grep tun0

With the systemctl device name, and having replaced docker.service if required proceed.

sudo mkdir /etc/systemd/system/docker.service.d/
sudo touch /etc/systemd/system/docker.service.d/depend.conf
sudo vi /etc/systemd/system/docker.service.d/depend.conf

# New conf file should only contain lines below
[Unit]
Requires=sys-devices-virtual-net-tun0.device
After=sys-devices-virtual-net-tun0.device

# Now save the file and exit vim

# Reload systemd daemons
sudo systemctl daemon-reload

# Test container connectivity following a reboot