Categories
VMWare

Vyatta : Slow Network Performance x-Subnet

Note When Vyatta Core got discontinued, a group of its users who wanted to keep using it forked the last available source code to start VyOS. See more here: https://vyos.io/

I’ve just moved the Vyatta device I deployed previously on Hyper-V to an ESXi environment. Initially all appeared well however yesterday I started to get some strange issues when accessing resources that were on a different subnet and thus passing through the Vyatta router.I did some simple copy paste tests and locally, in the same subnet, I was getting ~100 MB/sec, cross-subnet I was getting…wait for it… 15 KB/sec!

On further investigation the Vyatta device had ‘Flexible’ NIC’s instead of ‘vmxnet3’ NIC’s. On changing these NIC’s and reconfiguring the Vyatta device, including NAT rules, followed by a reboot I’m now getting 100MB/sec+.

Categories
General

VMWare Workstation : Using FreeNAS for Virtualised Windows Clusters

VMWare Workstation : Using FreeNAS for Virtualised Windows Clusters

You can obtain a copy of FreeNAS from the following location: http://www.freenas.org/

Installation is simple, create a FreeBSD (not 64-bit) VM with a 2GB HDD, 1 vCPU and 1GB of memory. Download the ISO and boot from it – select option 1 to install FreeNAS to the local hard drive.

FreeNAS Installation Scr1

Confirm the drive you wish to install to, and the prompt to erase all data on the drive.

 FreeNAS Installation Scr2

Wait for the installation to finish, then reboot the VM (I said it was simple!)

You’ll then be prompted to configure the NAS box, – by default FreeNAS support DHCP so if DHCP is available on your network you’ll find the FreeNAS VM already has an IP address:

To configure a static IP address:

  1. Select Option 1 from the boot menu to configure the IP addressing of the NAS
  2. When prompted to delete the existing configurtaion type ‘n’
  3. When prompted for the interface name type ’em0′ (this would have been listed when you entered menu option 1
  4. When prompted to configure IPv4 type ‘y’
  5. Enter your IPv4 address, for example: 192.168.0.175/24
  6. If desired configure IPv6

You can now access the web interface for the FreeNAS VM using the DHCP/static IP address:

 FreeNas Configure Scr4

Now add your required storage to the FreeNAS VM, we’ll use this to configure the iSCSI drives which will be presented to the Windows 2008 R2 VM’s for clustering.

To be continued….


Categories
General

Vyatta : Interfaces Become Unresponsive

Note When Vyatta Core got discontinued, a group of its users who wanted to keep using it forked the last available source code to start VyOS. See more here: https://vyos.io/

I recently deployed a Vyatta router into a Hyper-V test environment to connect multiple host-only networks and provide Internet access. The deployment was a success and is detailed here.

I found that after a large file transfer (download) or 3 or 4 days of use one or more of the interfaces on the Vyatta device would stop responding. Using tcpdump I found that the traffic siomply was not reaching the interface(s) that had stopped working: sudo tcpdump -nvi eth1

Intially I wondered if the VM was running low on memory; I had assigned only 128MB of RAM, so increased this to 256MB only to expereicne the same issues a few days later. I then came across trhe following forum post http://www.vyatta.org/forum/viewtopic.php?t=6221&sid=a15464ed60549a515c43bca4c26909b7 which described my issue perectly. The solution? Configure the VM to have 2 vCPU’s – ever since the Vyatta virtual router has been stable.

Categories
General

Vyatta : Configuring a Virtual Router

Note When Vyatta Core got discontinued, a group of its users who wanted to keep using it forked the last available source code to start VyOS. See more here: https://vyos.io/

Vyatta is a router that can be used in a Hyper-V or ESX Virtual machine and is available for download Vyatta Download. I’ve used this to connect host-only networks in order to create valid test environments, an example configuration is illustarted and detailed below.

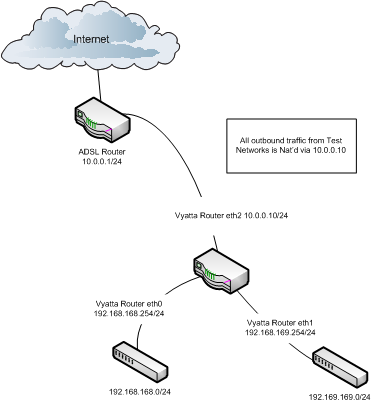
In order to implement the above configuration on the Vyatta virtual router follow the configuarion steps outlined below. For reference the default username / password is vyatta / vyatta.

Ensure that VM has 2 vCPU’s – with a single vCPU the interfaces can become unresponsive as per; http://www.vyatta.org/forum/viewtopic.php?t=6221&sid=a15464ed60549a515c43bca4c26909b7.

Under Hyper-V I can confirm this stable with 2 vCPU, 256MB RAM – your mileage may vary.

Deploy image to local drive:
install system

Once rebooted, login and enter configuration mode:
configure

Configure ethernet interfaces:
set interfaces ethernet eth0 address 192.168.168.254/24
set interfaces ethernet eth0 description “Network1”
set interfaces ethernet eth1 address 192.168.169.254/24
set interfaces ethernet eth1 description “Network2”
set interfaces ethernet eth2 address 10.0.0.10/8
set interfaces ethernet eth2 description “Internet”

Configure default gateway:
set system gateway-address 10.0.0.1

Configure DNS server:
set system name-server 8.8.8.8

Configure NAT Rule to masquaerade all traffic as the Vyatta device on the ‘external’ interface:
set nat source rule 20 source address 192.168.0.0/16
set nat source rule 20 outbound‐interface eth1
set nat source rule 20 translation address masquerade

Save/Commit:
commit
save

Exit Configuration mode:
exit

show interfaces ethernet
show system default-gateway
show nat rules
show nat statistics

Now run some basic connectivity tests to ensure:

  1. You can connect to the different subnets
  2. You can connect to the internet
Categories
General

vSphere : Building a Windows Cluster

vSphere : Building a Windows Cluster

Clustering Windows Server 2003, or 2008 under vSphere is a simple process:

  1. Create your two VM cluster nodes in the vSphere Console
  2. Install Windows Server Enterprise Edition on both nodes
  3. Add additional ‘cluster’ storage, attached to an additional shared SCSI controller (for Single Copy Clusters, SQL clusters or File/Print Clusters then do not use Paravirtual, use LSI Logic. Paravirtual is fine for an Exchange 2010 DAG.). You’ll get a new controller if you assign a SCSI ID to each new disk starting ‘1:’
  4. Ensure all disks that are shared are set to Independent Persistent
  5. Ensure all Disks are “eagerZeroedThick”
  6. Ensure the controller is set to Virtual Sharing in the VM configuration
  7. Build the cluster
The step that is often missed out is the modification of the vmx file for each cluster VM node; without these changes you’ll find that NTFS filesystems can become corrupted or SQL databases end up with torn pages / in a suspect state. You may even see chkdsk running after a failover from one node to another.
 
Add the following lines to the bottom of your vmx file to help alleviate these symptoms:
 
{code lang:ini showtitle:false lines:false hidden:false}disk.locking = “FALSE”

diskLib.dataCacheMaxSize = “0”{/code}


Categories
Performance

ESX 4.X : Increased RAM use on Intel EPT Enabled Processors


Why does memory utilisation appear higher on ESX 4.X when using Intel EPT Enabled Processors?


There is an simple reason why memory usage on your ESX 4.X boxes looks higher than on 3.5; ESX3.5 doesn’t support Intel EPT for HW MMU this is why you’ve not seen this in ESX 3.5. Had you been running AMD RVI capable processors you’d have encountered this with an upgrade from 3.0 to  3.5; ESX 4 was the first ESX platform to support Intel EPT; http://www.vmware.com/files/pdf/software_hardware_tech_x86_virt.pdf


Interpretation of esxtop counters is key here, counters we’re interested in:

·         “GRANT” (the amount of physical memory granted to a VM/pool)

·         “SHRD” (the shared portion of  “GRANT”.)

·         “SHRDSVD” (estimated saving due to TPS)

·         “COWH” (indication of memory which can be reclaimed by TPS)


When using Intel EPT – http://www.vmware.com/pdf/Perf_ESX_Intel-EPT-eval.pdf  – (or AMD RVI) and where a VM supports HWMMU the ESX kernel will use 2MB pages instead of 4KB pages. On these VM’s you will see low values for SHRD/SHRDSVD.


HWMMU is supported on all versions of Windows from 2003 onwards; it is also the default setting for VM’s running these operating systems on hardware that supports Intel EPT; http://kb.vmware.com/selfservice/microsites/search.do?language=en_US&cmd=displayKC&externalId=1020524


How can we interpret memory usage on ESX 4.X when using HWMMU?


Using esxtop you will find that Linux based VM’s will have high values for SHRD/SHRDSVD, this is because they do NOT use Intel EPT and therefore do not use HWMMU. As MMU is virtualised (software) small pages are used which play nicely with TPS. Windows 2003+ VM’s will use HWMMU and therefore will use large pages.


You can check the HWMMU status of a VM by checking the vmware.log and looking for “HV Settings” –look at the value for “virtual mmu” if ‘software’ the VM is not using HWMMU (Intel EPT) if ‘hardware’ it is.


Large Page support can be disabled (therefore forcing TPS to work regardless of contention), but there is a CPU performance impact (not massive to be fair but mileage may vary on this). At the end of the day TPS will kick in a claim back memory (significant amounts – http://vmnomad.blogspot.com/2011/08/shared-memory-effectiveness-of.html) at 94% used.


I hope this makes sense and sheds some light on why the ESX 4 boxes appear to be using more RAM.

Categories
General

ESXi : Performing P2V Conversions using VMWare Converter

ESXi : Performing P2V Conversions using VMWare Converter


In order to convert a system it must be out of production – i.e. no transactions or processing can take place during the conversion.


I recently had to conduct around 60 P2V migrations to an ESXi cluster. The physical machines were on various subnets protected by firewalls that could not be modified ad-hoc to facilitate the migrations. I had two options:


1.        Create rules for P2V communication; this requires (more information here: http://kb.vmware.com/selfservice/microsites/search.do?language=en_US&cmd=displayKC&externalId=1010056)


Source

Destination

TCP Ports

UDP Ports

Converter server

Source computer

445, 139, 9089, 9090

137, 138

Converter server

VirtualCenter

443


Converter client

Converter server

443


Source computer

ESX

443, 902


2.        Use a conversion hub to bridge the required networks and act as the converter. This should be a Windows 2008 R2 VM with a VMXNET3 adapter connected to each network hosting physical machines )enabled on-demand, as required). The server should have RRAS installed as detailed below; this server must have an interface on the management network of the ESXi hosts.


Concepts;

3 servers are involved in the migration process;

  • Source Server – the physical server you wish to convert to a virtual server
  • ESX/Destination Server – the destination ESX host you wish to virtualise the physical server too.
  • Converter Server – hostname vCONVERTER – Standalone Windows 2008 R2 with IP Routing Capabilities and VMware Converter – use RDP to access.


You have two options for the P2V conversion;

1.        Online (with transactional processing stopped)

2.        Cold Clone


For cold clone scenarios boot from the cold clone CD available and then proceed from step 6 under P2V Conversion. Things to bear in mind:

  • You cannot ping the WindowsPE cold clone operating system, this is due to Windows Firewall. You can disable this using petool (supplied with cold clone ISO) – petool -i -f –disable
  • The default gateway on the cold clone should be IP address of the vCONVERTER machine’s interface on the same subnet.
  • You can inject SCSI/Network drivers into the coldclone iso file using petool, use ‘-n’ for network and ‘-d’ for storage; petool -i -n


Online P2V


Preparation


1.        Reset the local administrator password on the source server, unless you are 100% sure you know the password.


2.        Stop all transactional processing (SERVICES) on the source server and then configure service start-up as follows:

a.       For SQL servers: set SQL services manual.

b.       For Citrix use the cold clone CD

c.        For a Domain Controller use the cold clone CD


3.        On the source server capture all IP addressing and NLB information/configuration:

 If the server is on a different subnet to the ESXi hosts you will need to configure host routes to facilitate firewall bypass:

For example:

  • Physical host IP address: 172.20.20.152
  • ESXi Server IP address: 10.144.120.1
  • vCONVERTER ESXi Mgmt Network IP: 10.144.120.100
  • vCONVERTER emote subnet IP address: 172.20.20.155


                     I.      On the source server create a static host route to the ESXi server (change ESXi server IP address to suit), for example when EUVM01 (IP Address 10.144.120.1) is the destination – change the IP highlighted to suit:

route add 10.144.120.1 mask 255.255.255.255 172.20.20.155 -p


                    II.      On the destination ESXi server create a static host route to the source server (change source server IP address to suit), for example when ECOMWA4 is the source server – change the IP highlighted to suit:

esxcfg-route -a 172.20.20.152/32 10.144.120.100


P2V Conversion


1.        Logon to vcCONVERTER using Remote Desktop.


2.        Enable the additional NIC that is valid for your required conversion, at the very least you require the following NICs to be enabled:

a.       VMGMT-NETWORK-10.144.120.100-VLAN120

b.       INTERNAL


3.        Open the VMWare Converter Standalone Client from the desktop:


4.        Select connect to local server and click ‘Login’


5.        Click the Convert Machine button to proceed:


6.        Enter the source server name or IP address, authentication details and then click ‘Next.’ You may be prompted to install the VM Conversion agent, proceed; however this may reboot the server.


Once installed manually reboot the server.


7.        You will then be prompted to select a destination host. Because we have vApps the old converter crashes when you connect to the vCenter – If you do the converter will crash and you will have to start again!


8.        Enter the desired VM name (just the hostname, not FQDN), select the correct storage pool and ensure that the VM version is ‘Version 7’


9.        You are now able to modify the hardware that the virtual machine will be allocated; click EDIT next to any of the groups (Network etc) to begin the customisation.


Firstly configure the NIC VLAN membership; do not create teams etc.

  • Un-tick the ‘Connect at power on’ option.
  • Do not worry about selecting the correct VLAN/Network at this stage, for some reason this is ignored during the conversion process.


10.     Now reduce the CPU count to 1 or 2(MAX) depending on function of the server.


11.     Finally increase/decrease the storage allocation for each LUN, beware there are three type of clones that can occur:

1.        Disk-based Block-Level (Disk-based)

Available during a cold clone only; disks are copied to the destination block by block.


2.        Volume-based Block-Level (Volume-based)

Examine the source partition to determine what the partition boundaries are on-disk and then copy just the selected partitions on to the target disk on a block-by-block basis


3.        Volume-based File-Level (File-level)

Converter creates the target disk, partitions and formats it appropriately and copies over data from the source to the target on a file-by-file basis


If you reduce the size of a volume it will use the Volume-based File-Level method; typically this is around 5-10 times slower. In a trial conversion of a BL35p we saw Volume-based Block-Level run at around 18MB/sec and Volume-based File-Level run at around 100-300KB/sec. Disabling anti-virus, defragging the volume may help to speed up Volume-based File-Level clones.


Select Advanced


12.     If the server has 2 partitions split these into different vDisks as it will make future growth exercises far easier, click the Add Disk, then click the ‘Move Down’ – do this for each partition.


You can, if desired, perform a ‘Thin’ P2V using the option available here under the ‘Type’ column select the drop-down box to change disk format to thin.


13.     Service Management:

a.        If server is a Citrix Server set all Citrix services to ‘Manual’

b.        If this is a SQL Server set all SQL services to Manual

c.        Disable all HP (or similar OEM) Hardware/Management Services:


14.     Finally select the ‘Power off source machine’ and ‘Install VMWare Tools…’ options, then click ‘Next.’


15.     Review the task you are about to initiate, then click Finish – you may be prompted to reboot the source server, click Yes to reboot – the conversion will start automatically after the reboot.


16.     Once the VM conversion has finished power on the VM and then allow the server to reboot automatically once it has installed the VM tools, you’ll be prompted to select a host to power on the VM on:


17.     If the physical server was a Windows 2000 server, check that it is not stuck on the ‘It is now safe to turn off your computer’ screen. Physically power it off and remove from the rack/chassis.


18.     If server was IDE based you will need to perform the steps here and modify the vmdk files so that the adapterType is not IDE but buslogic. Then detach and re-attache the VMDK:

http://kb.vmware.com/selfservice/microsites/search.do?language=en_US&cmd=displayKC&externalId=1016192


19.     If the server is a Windows 2003 or newer server, or you P2V’d using the cold clone disk you will have to add a new adapter,

o         For Windows 2003/2008/R2: remove all E1000 adapters on Windows 2000+ VM’s and use VMXNET3,

o         For Windows 2000 use E1000.


Click Add, select Ethernet Adapter and change the type to VMXNET3. Finally select the desired network to connect to.


 20.     From the assign the correct VLAN to each virtual NIC, enable one at a time to know the correct one for each VLAN – they will become active in Control Panel once connected:


21.     Power off and remove all COM Ports, Floppy Drives and USB Controllers, once complete power on the server:


22.     From Add/Remove Programs remove all HP components except from Data Protector. Once completed reboot the server. You may have to kill a stuck service using task manager if the HP Insight Agents are in a Stopping State, look for cqmgserv.exe.


23.     Manually remove the HP Network Team Adapter from Device Manager:


24.     Take a snapshot of the Virtual Machine.


25.     Download and run the ‘renewusb_2k.cmd’ (available here: http://cb-net.co.uk/downloads/devcon.zip) script to cleanup hidden/now invalid devices.


26.     If server is a HP server download (available here: http://cb-net.co.uk/downloads/HPPSPCleaner.exe). Credits for this tool http://ctxadmtools.musumeci.com.ar/HPPSPCleaner/HPPSPCleanerDownload.html.


Check network connectivity, check network connectivity x-chassis’ and x-host


27.     Delete static route from ESXi server (modify to suit the route you created earlier!):

esxcfg-route -d 172.20.20.141/32 10.144.120.100


28.     Delete the route from the Windows Host


29.     Delete the snapshot you created earlier.


30.     If this is a Citirx server perform the following additional actions:


a.        To ensure users cannot access VMware Tools from the system tray or control panel:  

1.        Go to C:\Program files\VMware\VMware Tools .

2.        Right-click VMControlPanel.cpl properties and choose Security.

3.        Click Advanced and deselect Allow inheritable permissions.

4.        Click Deny for Read and Execute and Read for the users

5.        Log in as an Administrator.

6.        Right-click on the VMware Tools system tray icon.

7.        Choose Disable.

8.        In the registry editor, delete the VMware Tools key under

HKEY_LOCAL_MACHINE\SOFTWARE\Microsoft\Windows\CurrentVersion\Run


b.        Install WindowsServer2003-KB978243-x86-ENU.exe from P2V folder.

c.        Set /NoExecute=OptIn in the boot.ini file if the Citrix server is x86.

d.        Again, for Citrix Ensure that WindowsServer2003-KB2279561-x86-ENU.exe is installed (available in P2V folder) – this resolves stop 0x00000050 errors when using user mode printer drivers:


e.        If server is a Citrix server adjust the page file to be RAM x 2 + 100MB (or if equal to/above 8GB RAM then RAM + 100MB)

f.         If you have modified the PageFile and extended the System drive run PageDefrag to create a contagious page file.

g.        If server is a Citrix server set services back to the correct start-up value:


h.        Finally, in order to ensure user profiles are not corrupted:

1.        Access the Windows Registry. Choose Start > Run, then type regedit. The Registry Editor window opens.

2.        Navigate to HKEY_LOCAL_MACHINE\SYSTEM\CurrentControlSet\Control\NetworkProvider\Order\.

3.        Right-click ProviderOrder and choose Modify. In the Edit String Value dialog box, edit the value data string and remove the word hgfs, vmhgs, or vmhgfs).

o        If the value data string contains LanmanWorkstation,hgfs, LanmanWorkstation,vmhgs, or LanmanWorkstation,vmhgfs, change it to LanmanWorkstation.

o        If the value data string contains only hgfs or vmhgfs, erase it and leave the value data string empty.

4.        Click OK.

5.        Close the registry editor. Choose File > Exit.

Reboot the virtual machine.


31.     If server is Windows 2003+ use Network Load Balancer MMC tool to re-add host, for Windows 2000 manually reconfigure the host. Including adding the secondary IP address to the host.


32.     If server is a Windows 2003 server power off VM and configure Hardware Instruction Set and MMU virtualisation. Under the properties of the VM select the ‘options’ tab, then select CPU/MMU Virtualisation options. Select the value to suit your environment.


33.     Again, if the server was a HP server, Delete the following registry keys:

Ø       HKEY_LOCAL_MACHINE\SYSTEM\CurrentControlSet\Services\CPQTeamMP

Ø       HKEY_LOCAL_MACHINE\SYSTEM\CurrentControlSet\Services\CPQTeam

Ø       HKEY_LOCAL_MACHINE\SYSTEM\CurrentControlSet\Services\cpqasm2

Ø       HKEY_LOCAL_MACHINE\SYSTEM\CurrentControlSet\Services\CpqCiDrv

Ø       HKEY_LOCAL_MACHINE\SYSTEM\CurrentControlSet\Services\CpqCiDrv\Security


34.     Remove any HP Network Utility bindings from the VM NICs


35.     Configure LAN interface power management options (disable power management!):


36.     Move VM to the correct resource pool and adjust resource pool shares accordingly

37.    Confirm that the following DWORD value is set to HEX 3C:

   HKEY_LOCAL_MACHINE\SYSTEM\CurrentControlSet\services\Disk\TimeOutValue

38.     Test server/application.

Categories
General

ESXi : Using VMA to manage ESXi server logs

ESXi : Using VMA to manage ESXi server logs

ESXi uses a scratch partition to store logs files; when a server is restarted/rebooted logs will be lost. Using vMA it is possible to ship logs to another server in order to preserve them for troubleshooting purposes.

Logs are stored under /var/log/vmware/


The following logs are collected from ESXi servers:

  • Hostd – Host Management service log
  • messages – VMkernel, vmkwarning, and hostd log
  • vpxa – vCenter Agent log


The settings defined in your vMA setup will determine how many logs are stored for your ESXi hosts, for example the following command will store 20 log files with a maximum size of 10MB per log file, logs will be collected every 10 seconds:

vilogger enable –server vm01.domain.local –numrotation 20 –maxfilesize 10 –collectionperiod 10


It is also possible to use the built-in syslog server to store logs to a datastore: http://kb.vmware.com/selfservice/microsites/search.do?cmd=displayKC&externalId=1016621

Categories
General

vCenter : Creating a new vSphere Cluster in vCenter

Creating a new vSphere Cluster in vCenter

Right-click the Datacenter object in the vCenter tree and select ‘New Cluster’


 The ‘New Cluster Wizard’ will be launched, enter a Cluster Name and select the cluster features you would like to enable:


 If you enable DRS you will be prompted to configure DRS;

  • Manual (suggest only, no automation)
  • Partially Automated (VM’s will automatically start on a node determined by DRS, but will not be moved)
  • Fully Automated (VM’s auto power on DRS assigned node and will be moved according to DRS)


 You will also be prompted to enable/disable DPM (VM hosts will be powered on/off dynamically as capacity requirements increase):

  • Off
  • Manual (recommend only)
  • Automatic (automated)


Next you’re prompted to configure VMHA, depending on your configuration you will want to set:

  • Enable Host Monitoring (recommended in most scenarios)
  • Enable/Disable Power on VM’s that violate availability constraints

 I have selected the latter because I have then determined VM HA requirements on a per-VM basis on the cluster (shown later).


You’ll then be prompted to configure the defaults for VM restart priority and the Host Isolation Response:  


You can also monitor individual VM’s if required; VM’s will automatically restart if monitoring fails:


In order to ensure host compatibility with the cluster you can enforce an EVC mode:


Configure the default swap-file location:


Then click finish to create the cluster:


To add nodes to the cluster simply drag and drop them into the new cluster object in the vCenter tree:


 You will see the progress of each node being added in the task status area of the venter console:


Categories
General

vCenter : Installation Steps for Remote Clustered SQL Database

vCenter Build : Installation Steps

1    vCenter 4.1 does not support 32-bit OS; use Windows 2008 R2 x64 Standard

2    Install / Configure a SQL 2008 R2 Cluster Database (outside the scope of this document), set the Instance port to 2126

3    Execute the following SQL to allow DP backups:   

  • CREATE LOGIN [DOMAIN\svc_DP-agent] FROM WINDOWS 
  • sp_addsrvrolemember @loginame =  [DOMAIN\svc_DP-agent], @rolename = 'sysadmin'

4    Create two databases on the HA database cluster:  

  • VCDB1 
  • VCUMDB1

5    Create a sevrice account for the vCenter cluster:   

  • svc_euvcenter01 (Note each vCenter must have a unique account (offline vCenter shares the same as online))

6    Using secpol.msc or Group Policy grant the service account tothe following user rights on both VCENTER servers:

  • Act as part of the Operating System
  • Logon as a Service

8    Execute the following SQL to add the user to the SQL instance:  

  • CREATE LOGIN  [DOMAIN\svc_euvcenter01] FROM WINDOWS

9    Execute the following SQL:

  • ALTER LOGIN   [DOMAIN\svc_euvcenter01] WITH DEFAULT_DATABASE = VCDB1

10    On VCDB1 execute the following SQL:  

  • EXEC sp_changedbowner @loginname='svc_euvcenter01' @map='true'

11    On VCUMDB1 execute the following SQL:  

  • EXEC sp_grantdbaccess 'DOMAIN\svc_euvcenter01', 'svc_euvcenter01'   EXEC sp_addrolemember 'db_owner', 'svc_euvcenter01'

12    Grant the service account db_owner permissions on the MSDB database:  

  • USE MSDB;   GO   EXEC sp_grantdbaccess 'spicerseu\svc_euvcenter01', 'svc_euvcenter01'   EXEC sp_addrolemember 'db_owner', 'svc_euvcenter01'

13    Create the following SQL Maintenence Tasks:  

  1. Daily 21:00 Check Integrity, Backup and Cleanup old BAK Files VCDB1  
  2. Daily 22:00 Check integrity, Backup and Cleanup old BAK Files VCUMDB1  
  3. Weekly 00:00 Sunday Check Integrity, Backup and Cleanup BAK Files SYSTEM Database

14    Make the svc_euvcenter01 account a local administrator on the vCenter server

15    Install SQL 2008 Native Client on both vCenter Servers

16    Create a 64-bit ODBC DSN for VCDB1:  

  1. Select SQL Native Client as driver  
  2. Server: EUVCDBCL1I1\I1,2126  
  3. Use Windows Authentication (do not define SPN)  
  4. Change default database to be VCDB1

17    Create a 32-bit ODBC DSN for VCUMDB1:  

  1. Select SQL Native Client as driver  
  2. Server: EUVCDBCL1I1\I1,2126  
  3. Use Windows Authentication (do not define SPN) 
  4. Change default database to be VCUMDB1

18    Create a exclusion policy for McAfee and apply to vCenter servers:   \Device\vstor*

19    Create firewall exceptions on EUVCENTER01/02:  

  • netsh advfirewall firewall add rule name="vCenter HTTP" dir=in action=allow protocol=TCP localport=80
  • netsh advfirewall firewall add rule name="vCenter AD Services" dir=in action=allow protocol=TCP localport=389
  • netsh advfirewall firewall add rule name="vCenter Client Listener" dir=in action=allow protocol=TCP localport=443
  • netsh advfirewall firewall add rule name="vCenter Linked Mode SSL" dir=in action=allow protocol=TCP localport=636
  • netsh advfirewall firewall add rule name="vCenter Management" dir=in action=allow protocol=TCP localport=902
  • netsh advfirewall firewall add rule name="vCenter Console" dir=in action=allow protocol=TCP localport=903
  • netsh advfirewall firewall add rule name="vCenter Management WebService" dir=in action=allow protocol=TCP localport=9080
  • netsh advfirewall firewall add rule name="vCenter HTTPS" dir=in action=allow protocol=TCP localport=9443
  • netsh advfirewall firewall add rule name="vCenter SDK" dir=in action=allow protocol=TCP localport=60099

20    Enable ICMP Echo Request on both vCenter Servers

21    Install .NET 3.5.1 via Server manager > Features

22    Install J# x64 from VMware-VIMSetup-all-4.1.0-259021\redist\vjredist

23    Install Visual C++ 2005, 2008 (x64 and x86) from VMware-VIMSetup-all-4.1.0-259021\redist\vcredist\2005

24    Logon as service account

25    Install vCenter:

  • Ensure that Web Server HTTP/HTTPS ports are changed from 8443 and 8080 to 9443 and 9080 this is because these ports conflict with McAfee EPO
  • Create dependency on MacAfee Framework Service for vpxd (due to conflict)

26    Restart server, check all VMWare services start

27    Remove MSDB permissions for svc_euvcenter01 account (when second sever is completed)

28    Configure Virtual Connect profiles for all VM servers   

29    Deploy ESXi to all virtual hosts using HP ESXi media

30    Configure TCP/IP, hostname and root password to XXXXXXXXX and set management VLAN (if applicable)

31    Configure forward and reverse DNS entries for vCenter Servers

32    Login to vSphere Client

33    Add licenses to vCenter

34    Create a new Datacenter

35    Import vSphere Hosts

36    Set Time Server Settings

37    Create a vSphere cluster

38    Drag and drop nodes imported into cluster

39    Create the following distributed switches:  

  • dvSwitch_Management/vMotion
  • dvSwitch_Ecommerce
  • dvSwitch_Internal

40    Create the following dvPortGroups under dvSwitch_Management/vMotion: 

  • dvPortGroup_Internal_VLAN120  
  • dbPortGroup_Internal_VLAN121
  • dbPortGroup_Internal_VLAN121

41   Create the followingdvPortGroups under dvSwitch_Internal:  

  • dvPortGroup_Internal_VLAN1  
  • dvPortGroup_Internal_VLAN90  
  • dvPortGroup_Internal_VLAN110  
  • dvPortGroup_Internal_VLAN115

42   Create the followingdvPortGroups under dvSwitch_Ecommerce:

  • dvPortGroup_Ecommerce_VLAN1  
  • dvPortGroup_Ecommerce_VLAN10  
  • dvPortGroup_Ecommerce_VLAN20  
  • dvPortGroup_Ecommerce_VLAN35  
  • dvPortGroup_Ecommerce_VLAN70

43  On dvSwitch_Internal change teaming and failover settings so that VLAN120 is preferred on adapter dvUplink1 and VLAN121 and VLAN122 are preferred on dvUplink2

44  Migrate server console to dvSwitch_ManagementvMotion

45    Define host level vmk1 and vmk2 Virtual Adapter and enable vMotion – this is a manual process on each host individually

46    Create host profile and validate all nodes against this

47    Present shared storage to all cluster nodes

48    Configure datastores and ensure availability on all hosts; odds sys side, evens cdc side

49    Create Windows and Linux VM’s

50    Test vMotion Host move

51    Test vMotion Datastore Move

52    Test VMWare HA

53    Test vVMWare DRS

54    Test DR scenarios:  

  1. Controlled shutdown
  2. Storage failover
  3. VMHA – Poweroff Node and wait for VM startup on another node
  4. SAN Storage Failover

55    Configure Network IO correctly on each Distributed Switch

56    Configure vCenter Mail Settings

57    Configure Exchange CAHT relay permissions

58    Configure alarms to send emails for the following host related issues:  

  • Host connection failure  
  • Host Storage Status  
  • Network connectivity lost  
  • Network uplink redundancy degraded  
  • Host CPU Usage  
  • Host Memory Usage

59    Modify c:\Program Files\VMware\Infrastructure\VirtualCenter Server\extensions\com.vmware.vim.stats.report\extension.xml  

  • Replace * with server FQDN this will resolve the ‘Navigation to the webpage was cancelled Refresh the page’ error

Setup Standby vCenter Server

1  Stop live vCenter VMWare Services, shutdown live vCenter

2    Perform full database backup

3    Make the svc_euvcenter01 account a local administrator on the vCenter server

4    Install SQL 2008 Native Client

5    Create a 64-bit ODBC DSN for VCDB1:  

  • Select SQL Native Client as driver  
  • Server: EUVCDBCL1I1\I1,2126  
  • Use Windows Authentication (do not define SPN) 
  • Change default database to be VCDB1

 6   Create a 32-bit ODBC DSN for VCUMDB1:  

  • Select SQL Native Client as driver  
  • Server: EUVCDBCL1I1\I1,2126  
  • Use Windows Authentication (do not define SPN)  
  • Change default database to be VCUMDB1

7    Create a exclusion policy for McAfee and apply to vCenter servers:   \Device\vstor*

8    Install .NET 3.5.1 via Features

9    Install J# x64 from VMware-VIMSetup-all-4.1.0-259021\redist\vjredist

10  Install Visual C++ 2005, 2008 (x64 and x86) from VMware-VIMSetup-all-4.1.0-259021\redist\vcredist\2005

11  Logon as service account:   svc_euvcenter01   p/w:XXXXXXXXX

12  Install vCenter, using the same license key as the other vCenter  

  • Ensure that WebServer HTTP/HTTPS ports are changed from 8443 and 8080 to 9443 and 9080 this is because these ports conflict with McAfee EPO

13    Restart server, check all VMWare services start

14    Modify c:\Program Files\VMware\Infrastructure\VirtualCenter Server\extensions\com.vmware.vim.stats.report\extension.xml  

  • replace * with EUVCENTER01.spicers.europeThis will resolve the ‘Navigation to the webpage was cancelled Refresh the page’ error

15   Configure same IP address as EUVCENTER01 – YES

16   Login to the Standby vCenter

17   Re-connect each ESXi host

18   Create dependency on mcAfee framework service for vpxd