Categories
Citrix

NetScaler : Configuring High Availability

In a NetScaler Load Balancing Exchange 2010 I covered deployment of a NetScaler device to Load Balance Exchange 2010, this is an extension fo that article – illustrating how to configure a second NetScaler device in a High Availability Pair.

In this article I’ll illustrate how to add a secondary NetScaler device and configure High Availability to ensure you have a resiliant NetScaler deployment.

Categories
ConfigMgr

ConfigMgr 2012 : PXE Distribution Point Certificate Issues – “No Items Found”

I ran into an issue with a System Center Configuration Manager 2012 deployment recently where if I selected the Distribution Point to be PXE enabled and then imported a certificate from our PKI I was unable to view or configure any of the server roles anymore. I simply got “Not items Found” in the ConfigMgr console!

NoItems

Working with Microsoft Support it was identified that our Certificate size exceeded 32K, which is larger than the buffer used by ConfigMgr. The XML assocaited with the Distribution Point was then being truncated leading to the error in the ConfigMgr console, as above.

Note; if your issue is affecting a SECONDARY SITE then see note at the bottom of the article.

Categories
Citrix

NetScaler : Load Balancing Exchange 2010

This article will illustrate configuration of both a one-arm and two-arm topology for load balancing Exchange 2010 SP1 using a single NetScaler VPX (NS9.3: Build 52.3.nc). The specific focus is on a one-arm topology, however I’ll clearly outline what’s required if you decide to use a two-arm configuration; either way by the end of the article you’ll have a working deployment… I hope!

This guide assumes you have deployed the NetScaler VPX and configured an IP address – for information on how to do this see the NetScaler Deployment Article.

Categories
Windows 2008

AD CS : CertSrv Website “No certificate templates could be found”

AD CS : CertSrv Website “No certificate templates could be found”

Recently I deployed two Windows 2008 R2 Enterprse Subordinate Certificate Authorities, whilst these have been issuing certificates requested through Autoenrollment I noticed today that the web interface for requests wasn’t working properly using https://<caname>/certsrv. When clicking on “‘Request a certificate’, then ‘Create and submit a request to this CA” I would then get the following error message:

“No certificate templates could be found. You do not have permission to request a certificate from this CA, or an error occurred while accessing the Active Directory.”

Aftering digging about it turned out that by this is resolved by using IIS Manager and changing the DefaultAppPool Identity to NetworkService from ApplicationPoolIdentity:

  1. This is available by rt-clicking the DefaultAppPoll under Application Pools and selecting “Advanced Settings..”
  2. Look for the “Identity” value under Process Model and change to NetworkService.
  3. Once completed perform an iisreset on the CA.
Categories
Windows 2008

IIS : Windows Authentication 401.2 Unauthorised

IIS : Windows Authentication 401.2 Unauthorised

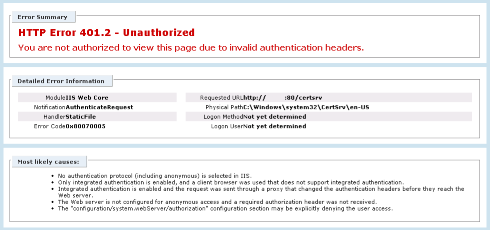
Having deployed a couple of Certificate Authorities recently I ran into an issue with the Web interface http://<caname>/certsrv where despite entering valid credentials I was continually prompted for a username and password, and eventually a 401.2 Unauthorised error.

ca-error

On further investigation it turned out that the Windows Authentication providers were the cause, chaging this from Negotiate,NTLM to NTLM,Negotaite (you could even remove the Negotiate provider) resolves this issue, click read more to see the solution. 

Categories
General

VMWare Workstation : Using FreeNAS for Virtualised Windows Clusters

VMWare Workstation : Using FreeNAS for Virtualised Windows Clusters

You can obtain a copy of FreeNAS from the following location: http://www.freenas.org/

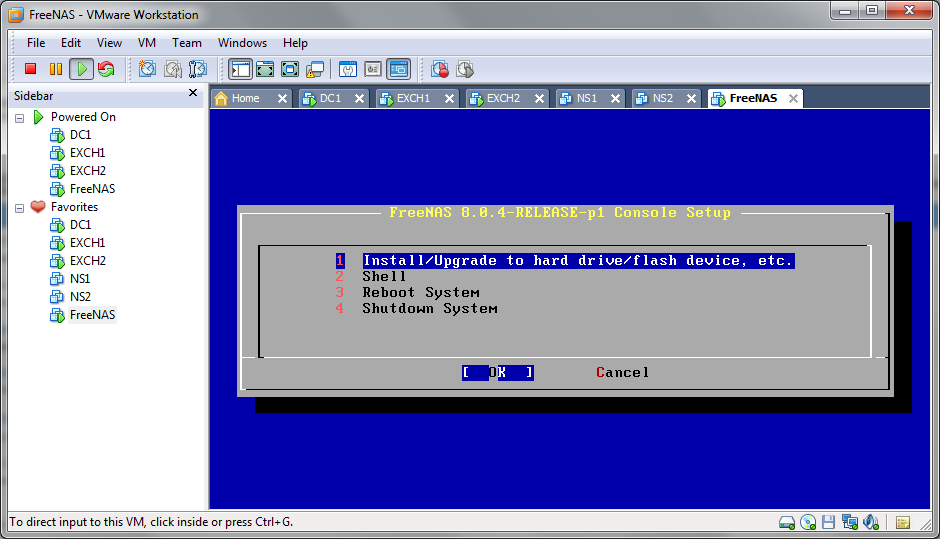
Installation is simple, create a FreeBSD (not 64-bit) VM with a 2GB HDD, 1 vCPU and 1GB of memory. Download the ISO and boot from it – select option 1 to install FreeNAS to the local hard drive.

FreeNAS Installation Scr1

Confirm the drive you wish to install to, and the prompt to erase all data on the drive.

 FreeNAS Installation Scr2

Wait for the installation to finish, then reboot the VM (I said it was simple!)

You’ll then be prompted to configure the NAS box, – by default FreeNAS support DHCP so if DHCP is available on your network you’ll find the FreeNAS VM already has an IP address:

To configure a static IP address:

  1. Select Option 1 from the boot menu to configure the IP addressing of the NAS
  2. When prompted to delete the existing configurtaion type ‘n’
  3. When prompted for the interface name type ’em0′ (this would have been listed when you entered menu option 1
  4. When prompted to configure IPv4 type ‘y’
  5. Enter your IPv4 address, for example: 192.168.0.175/24
  6. If desired configure IPv6

You can now access the web interface for the FreeNAS VM using the DHCP/static IP address:

 FreeNas Configure Scr4

Now add your required storage to the FreeNAS VM, we’ll use this to configure the iSCSI drives which will be presented to the Windows 2008 R2 VM’s for clustering.

To be continued….


Categories
Citrix

NetScaler : Evaluating Citrix NetScaler (on VMware Workstation)

Deploying the Virtual Machine

First you’ll need to convert the OVF available for ESX using the OVF tool available here. Once installed, extract the NetScaler archiveand run the following command – changing the paths appropriately:

{code lang:css showtitle:false lines:false hidden:false}C:\Program Files\VMware\VMware OVF Tool\ovftool.exe “X:\NSVPX-ESX-9.3-52.3_nc\NSVPX-ESX-9.3-52.3_nc Folder\NSVPX-ESX-9.3-52.3_nc.ovf” “X:\NSVPX-ESX-9.3-52.3_nc\NSVPX-ESX-9.3-52.3_nc Folder\NSVPX.vmx”{/code}

The machine must have 2 vCPU’s and 2GB RAM in order to boot, so dont think about changing these as I did!

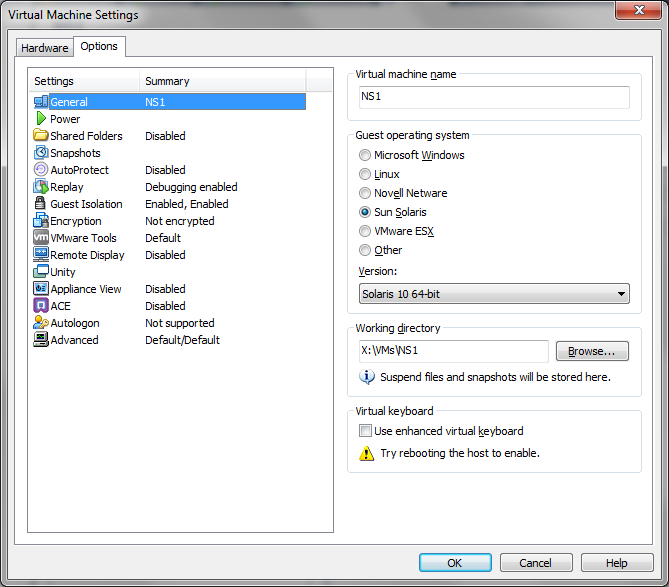
You’ll need to make one change in the VM settings; the Operating System – change this to Solaris 10 64-bit:

NetScaler OS Settings

 Power on the VM, you’ll then be prompted to configure IPv4 addressing:

NetScaler IPv4 Addressing

When finished you’ll be able to use a browser to navigate to the NetScaler Web Interface, after login you may be prompted to install JRE 6 update 14.

 NetScaler Web Logon

The default username and password are nsroot / nsroot

Initial Setup Wizard

When you login for the first time you’ll be prompted with the setup wizard, click next to proceed:

netscaler-setupwizard

Confirm TCP/IPv4 settings for the NetScaler and also define the Mapped IP (MIP) Address – this is the address that client connections will appear to come from on your load balanced servers that utilise the NetScaler;

netscaler-setupwizard2

Choose to skip any configuration on the next page if you are using NetScaler for Exchange 2010, your configuration may vary here:

netscaler-setupwizard3  

Click finish on the summary screen to apply the configuration:

netscaler-setupwizard4  

Close any other windows that popup following this wizard. 

Obtain License From Citrix

Next things next you’ll need ot obtain a license from Citrix for the NetScaler;

  1. Go to MyCitrix and create a new account, or login using your existing MyCitrix credentials.
  2. After login, go to: My tools > Choose a Toolbox > Manage Licenses > Allocate.
  3. Select the Don’t see your product? Link located at the top right corner of the Allocate web key page.
  4. Enter the license code(s) displayed above in the Find your license dialog box and click Continue. 
  5. When the Host Name warning page displays, select Continue. The hostname can be obtained using the following commands form the console:

{code lang:css showtitle:false lines:false hidden:false}shell{/code}

{code lang:css showtitle:false lines:false hidden:false}lmutil lmhostid –ether{/code}

(NOTE; remove the colon’s from the MAC address when inputting it into My Citrix!)

 Installing the License

In order to utilise most of the NetScaler functions you need to import your license that you downloaded in the last step.

Browse to System > Licenses from the NetScaler Management Interface

netscaler-license1

At the bottom of the page there is a ‘Manage Licenses…’ link, click it, click Add and browse to the file you downloaded:

netscaler-license2

Finally, click ‘OK’ – you’ll be prompted to reboot, after-which your NetScaler is ready for configuration.

netscaler-license3


Categories
Lansweeper

LANSweeper : Identify Non-standard Browsers

LANSweeper : Identify Non-standard Browsers

The following query, when copied into the report designer, will identify computers with non-standard browsers – i.e. users with browsers other than Internet Explorer. Adjust this to suit your environment, corporate standards are different everywhere.

{code lang:sql showtitle:false lines:false hidden:false}Select Top 1000000 tblComputers.ComputerName,tblComputers.ComputerUnique,tblSoftware.softwareNameAsProduct, tblComputers.Domain,tblComputers.Username

From tblSoftware
Inner Join tblComputers On tblSoftware.ComputerName=tblComputers.Computername
Inner Join web40ActiveComputers On tblComputers.Computername=web40ActiveComputers.Computername

Where tblSoftware.softwareName Like ‘%Google Chrome%’
OR tblSoftware.softwareName Like ‘%Safari%’
OR tblSoftware.softwareName Like ‘%Mozilla%’

Group By tblComputers.ComputerUnique,tblComputers.ComputerName,tblSoftware.softwareName,tblComputers.Domain,tblComputers.Username

Order By tblSoftware. softwareName{/code}

Categories
Windows 2008

AD DS : Find Users with Specific Home Drive Path

AD DS : Find Users with Specific Home Drive Path

I had to move some users home directories from one server to another recently, the users Mac users had their home drive set in AD DS rather than using folder redirection determined by Group policy.

In AD Users and Computers I used the following customer search to identify all of the users; change *server name* to suit your environment:

{code lang:css showtitle:false lines:false hidden:false}(&(objectClass=user)(objectCategory=person)(homeDirectory=*server name*)){/code}

For example, if your file server waqs called FILESRV1 you would change the query to use *FILESRV1*:

{code lang:css showtitle:false lines:false hidden:false}(&(objectClass=user)(objectCategory=person)(homeDirectory=*FILESRV1*)){/code}

Categories
Exchange Server 2007

Exchange : Database Sizing Scripts

Exchange : Database Sizing Scripts

I’ve recently been asked to size some Exchange 2007 environments for migration to Exchange 2010; specifically database sizes. I used the following scripts to perform this task.

Export User Mailbox Sizes

This script will give you an idea of allocated storage, regardless of Single Instance Storage – this is important as Exchange 2010 no longer includes Single Instance Storage. Microsoft suggest that you should allow a 15% increase in storage, in reality I’ve found this to be a very accurate figure to go by. Change the server name in the script an you’re good to go.

{code lang:css showtitle:false lines:false hidden:false}Get-MailboxServer <server name> | Get-MailboxStatistics | Sort -Property TotalItemsize | select-object DisplayName, LastLoggedOnUserAccount, ItemCount, @{name=”Size(MB)”;expression={$_.totalitemsize.value.ToMB()}} | export-csv stats.csv{/code}

Find Database File Size

This script will show the physical file size of each database. Remember this will not give an indication of the true data size of all user mailboxes, unless you add approx 15% to the size (YMMV). Again, change the server name.

{code lang:css showtitle:false lines:false hidden:false}Get-ExchangeServer <server name> | Get-MailboxDatabase | foreach-object {add-member -inputobject $_ -membertype noteproperty -name mailboxdbsizeinMB -value ([math]::Round(([int64](get-wmiobject cim_datafile -computername $_.server -filter (‘name=”’ + $_.edbfilepath.pathname.replace(“\”,”\\”) + ””)).filesize / 1MB),2)) -passthru} | Sort-Object mailboxdbsizeinMB -Descending | format-table identity,mailboxdbsizeinMB{/code}

Database Whitespace

If you are using Enterprise Vault or something similar chances are you’ll have a good chunk of white space in your database which you wont need to provision for on the new environment. To identify the amount of white space in your database files use the code below, execute on the Mailbox server itself.

{code lang:css showtitle:false lines:false hidden:false}$yesterday = [DateTime]::Now.AddDays(-1)
$Events = Get-Eventlog Application | Where {($yesterday -le $_.TimeWritten)} | ?{$_.eventid -eq “1221”}
$Events | select-object Message | ft{/code}