Categories
Linux

Debian 8.6, guacamole; install and configure mysql back-end

In previous posts I have covered a basic installation of guacamole, using a user-mapping.xml file to define users and connections, I have also covered how to publish guacamole using apache2 over HTTPS whist protecting your deployment with fail2ban and ufw.

In this post I outline the steps required to move your guacamole installation to a mysql back-end.

First, lets install and configure mysql – you’ll need a root password and a password for the “guacamole” mysql user:

# Install mysql server
apt-get install mysql-server

# you'll be prompted for a root user account password
<password>
    
# review /etc/mysql/my.cnf for bindings, by default mysql will listen on 127.0.0.1 only.
vi /etc/mysql/my.cnf

# secure your mysql deployment
mysql_secure_installation

# prepare the database and user needed for guacamole
mysql -u root -p
    CREATE DATABASE guacamole;
    CREATE USER 'guacamole'@'localhost' IDENTIFIED BY '<password>';
    GRANT SELECT,INSERT,UPDATE,DELETE ON guacamole.* TO 'guacamole'@'localhost';
    FLUSH PRIVILEGES;
    quit

Download and deploy the mysql extension for guacamole (this must match the version of guacamole-client you are using):

cd ~
wget http://netix.dl.sourceforge.net/project/guacamole/current/extensions/guacamole-auth-jdbc-0.9.9.tar.gz
tar -zxvf guacamole-auth-jdbc-0.9.9.tar.gz
cd ~/guacamole-auth-jdbc-0.9.9/mysql
cp *.jar /etc/guacamole/extensions/
cd..

Now prepare the guacmole database using the supplied scripts:

cd ~/guacamole-auth-jdbc-0.9.9/mysql
cat schema/*.sql | mysql -u root -p guacamole

Next, download and deploy the mysql java connection library:

cd ~
wget https://cdn.mysql.com//Downloads/Connector-J/mysql-connector-java-5.1.40.tar.gz
tar -zxvf mysql-connector-java-5.1.40.tar.gz
cd mysql-connector-java-5.1.40
cp mysql-connector-java-5.1.40-bin.jar /etc/guacamole/lib/

Finally, you can clear the contents of your guacamole.properties file and add only the lines below, be sure to change the mysql user password accordingly – note you will need to recreate you user mappings via the guacamole admin console.

vi /etc/guacamole/guacamole.properties

# MySQL properties
mysql-hostname: localhost
mysql-port: 3306
mysql-database: guacamole
mysql-username: guacamole
mysql-password: <password>

Now restart tomcat8 (using “systemctl restart tomcat8” and browse to your guacamole deployment – you should be able to login using the credentials guacamole / guacamole.

As an aside, I did run into an issue where, having built the guacamole-client via git clone, I was unable to login using guacamole / guacamole credentials.

I was able to find an error in catalina.out:

cat /var/log/tomcat8/catalina.out | grep guacamole-auth-jdbc-mysql-0.9.9.jar

ERROR o.a.g.extension.ExtensionModule – Extension “guacamole-auth-jdbc-mysql-0.9.9.jar” could not be loaded: Authentication provider class cannot be loaded (wrong version of API?)

My solution was to stop tomcat8, remove the guacamole.war file, guacamole tomcat8 directory and then re-dploy the guacamole client, using the commands below:

# stop tomcat8
systemctl stop tomcat8

# remove guacamole files/ directoryrm /var/lib/tomcat8/webapps/guacamole.war
rm -r /var/lib/tomcat8/webapps/guacamole/

# download the pre-built guacamole-client
wget -O guacamole.war http://downloads.sourceforge.net/project/guacamole/current/binary/guacamole-0.9.9.war

# deploy and create symlink under tomcat8
cp /guacamole/target/guacamole.war /etc/guacamole/
ln -s /etc/guacamole/guacamole.war /var/lib/tomcat8/webapps/

# start tomcat8
systemctl start tomcat8
Categories
Linux

Debian 8.6, Proxy guacamole via Apache2 using HTTPS and Fail2Ban

In my previous article I explained how to install guacamole on Debian 8.6, in this article I cover how to publish this over https using Apache2, as well as using fail2ban and ufw in an attempt to protect the service.

First, install required pre-reqs:

apt-get install apache2 libapache2-mod-proxy-html

Now, we will modify the tomcat8 config

vi /etc/tomcat8/server.xml

Uncomment and modify the AJP/1.3 line accordingly:

 <Connector port="8009" protocol="AJP/1.3"
    URIEncoding="UTF-8"
    redirectPort="8443" />

Now restart tomcat8:

systemctl restart tomcat8.service

Now for Apache2 configuration. Firstly you’ll need to enable the following modules using a2enmod:

a2enmod proxy
a2enmod proxy_http
a2enmod proxy_wstunnel
a2enmod log_config
a2enmod ssl

Now for SSL configuration; generate your private key and CSR (yo can then process these with an external, third-part CA such as StartSSL – which is free.

openssl req -newkey rsa:2048 -keyout guac.key -out guac.csr

I’m now assuming you now have the following files:

  1. Root certificate bundle for your CA (.crt from third-part CA)
  2. Public key for your certificate (.crt from third-part CA)
  3. Private key for your certificate (.key file form OpenSSL command)

We’ll now copy these files to /etc/apache2/ssl:

mkdir /etc/apache2/ssl
cp 1_root_bundle.crt /etc/apache2/ssl
cp 2_guacamole.domain.com.crt /etc/apache2/ssl
cp guac.key /etc/apache2/ssl

Note, your .key file (private key) likely has a passphrase, you’ll want to remove this otherwise you’ll have to manually enter this when Apache2 loads:

openssl rsa -in guac.key -out guac-nopass.key

Now, protect those files!

chmod 600 /etc/apache2/ssl/*

Create a root directory for the new HTTPS site and enable mod_ssl:

mkdir /srv/www-guacamole

Now, we’ll configure the site definition in Apache2

vi /etc/apache2/sites-available/guacamole.conf

Contents as below – make sure you change the URL in bold – note the HTTPS definition uses IP address, not hostname. See this URL for more details, but by using hostname you will receive the following errors:

SSL received a record that exceeded the maximum permissible length. Error code: SSL_ERROR_RX_RECORD_TOO_LONG remote client

<VirtualHost guacamole.domain.com:80>
    ServerName guacamole.domain.com:80
    # Redirect traffic from 80 to 443, and also from / to /guacamole/
    Redirect permanent / https://guacamole.domain.com/guacamole/
    Redirect permanent /guacamole https://guacamole.domain.com/guacamole/
</VirtualHost>
<VirtualHost 192.168.1.249:443>

    # Redirect traffic from / to /guacamole/        
    Redirect permanent / https://guacamole.domain.com/guacamole/
    SSLEngine on
    SSLProtocol all -SSLv2 -SSLv3
    SSLCertificateFile /etc/apache2/ssl/2_guacamole.domain.com.crt
    SSLCertificateKeyFile /etc/apache2/ssl/guac.key
    SSLCertificateChainFile /etc/apache2/ssl/1_root_bundle.crt
    SSLCipherSuite ALL:!DH:!EXPORT:!RC4:+HIGH:+MEDIUM:!LOW:!aNULL:!eNULL
    ServerName guacamole.domain.com:443
    DocumentRoot /srv/www-guacamole	
    <Location /guacamole/>
        Order allow,deny
        Allow from all
        ProxyPass http://localhost:8080/guacamole/ max=20 flushpackets=on
        ProxyPassReverse http://localhost:8080/guacamole/
        SetEnvIf Request_URI "^/guacamole/tunnel" dontlog
    </Location>
    <Location /guacamole/websocket-tunnel>
        Order allow,deny
        Allow from all
        ProxyPass ws://localhost:8080/guacamole/websocket-tunnel
        ProxyPassReverse ws://localhost:8080/guacamole/websocket-tunnel
    </Location>
</VirtualHost>
CustomLog /var/log/apache2/guac.log common env=!dontlog

Next we need to enable this site using a2ensite:

a2ensite guacamole.conf

Now, restart Apache2:

systemctl restart apache2

Next, configure Apache2 to load on boot:

systemctl enable apache2

You’ll now be able to access your guacamole instance by using the URL: https://<your chosen url>

Now for the fail2ban installation and configuration – first download and install fail2ban:

cd ~
git clone https://github.com/fail2ban/fail2ban
cd fail2ban
python setup.py install
cp files/debian-initd /etc/init.d/fail2ban
systemctl daemon-reload
cp /etc/fail2ban/jail.conf /etc/fail2ban/jail.local

No we’ll enable the guacamole by editing /etc/fail2ban/jail.local

vi /etc/fail2ban/jail.local

# Add a new line "enabled = true" under [guacamole]
[guacamole]
enabled = true
port     = http,https
logpath  = /var/log/tomcat*/catalina.out

# Now save and close /etc/fail2ban/jail.local

# Prevent local network from banning - change as per your setup
sed -i "s|ignoreip = 127.0.0.1/8 ::1|ignoreip = 127.0.0.1/8 ::1 192.168.1.0/24|" /etc/fail2ban/jail.local

Lastly for fail2ban config, we need to adjust the regexthat detects failures – as per this site (where I found this fix!).

vi /etc/fail2ban/filter.d/guacamole.conf

# change this incorrect regex: failregex = ^.*\nWARNING: Authentication attempt from <HOST> for user "[^"]*" failed\.$ to this:

failregex = \bAuthentication attempt from \[<HOST>(?:,.*)?\] for user ".*" failed\.

Now, enable fail2ban to start on boot

systemctl enable fail2ban

Home straight now… ufw config. The commands below are specifically designed for the solution outlined in this post – please review and consider rules that apply to your environment. If you lose access to your server it’s not my fault!

# Install Uncomplicated Firewall
apt-get install ufw

# Allow HTTPS from 192.168.1.0/24 to guacamole/apache2 server
ufw allow from 192.168.1.0/24 to 192.168.1.249 port 443
# Allow HTTP from local LAN (for redirect only)
ufw allow from 192.168.1.0/24 to 192.168.1.249 port 80
# Enable Firewall
ufw enable


Categories
Linux

Debian 8.6, Jessie, Installing Guacamole

Update 09/2017 : I’d seriously consider using Docker to deploy Guacamole. See this article for more information : /linux/running-guacamole-from-a-docker-container-on-ubuntu-16-04-lts-16-10

Apache Guacamole is a clientless remote desktop gateway. It supports standard protocols like VNC, RDP, and SSH.

Client-less… yes! Guacamole uses HTML5 to do its stuff, so no client needed. I’ve used this to serve-out my X11rdp-enabled Debian 8.6 client (running guacamole itself) – but you could use this to front a variety of different clients.

This guide covers the steps needed to deploy v0.9.10 on Debian 8.6, Jessie; running 0.9.9? Check out this guide on how to upgrade to 0.9.10.

Lastly, if you want to use MySQL for the back-end – rather than XML files – see this guide: /linux/guacamole-0-9-10-automated-install-with-mysql-on-debian-8-6/

# Install Guacamole server pre-reqs including MySQL
apt-get install -y libjpeg-dev libcairo2-dev libossp-uuid-dev libpng12-dev libfreerdp-dev libssh2-1-dev libssh-dev libwebp-dev libpulse-dev libavcodec-dev libavutil-dev libswscale-dev libpango1.0-dev libvncserver-dev maven tomcat8 tomcat8-admin tomcat8-user default-jdk openjdk-7-jre openjdk-7-jdk java-common
# Download and install guacamole server
cd ~
git clone https://github.com/apache/incubator-guacamole-server
cd incubator-guacamole-server
autoreconf -fi
./configure --with-init-dir=/etc/init.d
make
make install
mkdir /etc/guacamole/extensions 
mkdir /etc/guacamole/lib

# Resolve freerdp directory issues present when running guacamole on Debian 8.6
mkdir /usr/lib/x86_64-linux-gnu/freerdp
ln -s /usr/local/lib/freerdp/guac* /usr/lib/x86_64-linux-gnu/freerdp/

# Download and package guacamole client
cd ~
git clone https://github.com/apache/incubator-guacamole-client
cd incubator-guacamole-client
mvn package

# TomCat WebApp and guacamole environment deployment 
cd ~/incubator-guacamole-client/guacamole/target 
cp guacamole-0.9.10-incubating.war /etc/guacamole/guacamole.war 
ln -s /etc/guacamole/guacamole.war /var/lib/tomcat8/webapps/ 
mkdir /usr/share/tomcat8/.guacamole
echo GUACAMOLE_HOME=/etc/guacamole >> /etc/default/tomcat8

# Create /etc/guacamole/guacamole.properties
touch /etc/guacamole/guacamole.properties 
ln -s /etc/guacamole/guacamole.properties /usr/share/tomcat8/.guacamole/

Create /etc/guacamole/guacamole.properties using the command:

vi /etc/guacamole/guacamole.properties

Now edit the file and enter the following lines – for more information on this file click here.

guacd-hostname: localhost
guacd-port:    4822
user-mapping:    /etc/guacamole/user-mapping.xml
auth-provider:    net.sourceforge.guacamole.net.basic.BasicFileAuthenticationProvider


Create /etc/guacamole/user-mapping.xml using the command:

touch /etc/guacamole/user-mapping.xml

Edit these lines prior to adding them to user-mapping.xml – you will want to change username, password (used to login to guacamole), protocol, target host etc. For more information on options / protocols / usernames / passwords etc see here.

This example is for a Windows 10 client with NLA enabled (the default configuration). You have to use two username/passwords in this example:

  1. The logon credentials for guacamole itself via http://<hostname>/guacamole/ – denoted username1/password1
  2. The pre-authentication (NLA) credentials for the target RDP client (windows credentials) – denoted username2/password2
<user-mapping>
  <authorize username="

username1

" password="

password1

">
   <connection name="

WIN-10-RDP

">
	<protocol>rdp</protocol>
	<param name="hostname">

192.168.1.5

</param> 
	<param name="username">

username2

</param>
	<param name="password">

password2

</param> 
	<param name="security">

nla

</param>
        <param name="ignore-cert">

true

</param>
   </connection>
  </authorize>
</user-mapping>

Alternatively, disable the NLA requirement on your Windows 10 client and set security to “tls” – you can then remove the connection specific username/password. When you connect via RDP you’ll then be prompted for credentials.

Another example, a Debian 8.6 x11rdp client – note the credentials here are those used to login to guacamole itself via http://<hostname>/guacamole/ – denoted username1/password1

<user-mapping>
	<authorize username="

username1

" password="

password1

">
		<connection name="

DEBIAN-RDP

">
			<protocol>

rdp

</protocol>
			<param name="hostname">

localhost

</param>
			<param name="port">

3389

</param>
		</connection>
	</authorize>
</user-mapping>

Once last example, an SSH client (see note about username/password above):

<user-mapping>
	<authorize username="

username1

" password="

password1

">
		<connection name="

DEBIAN-SSH

">
			<protocol>

ssh

</protocol>
			<param name="hostname">

localhost

</param>
		</connection>
	</authorize>
</user-mapping>


If you forget the freerdp fix above, you will get errors such as those below relating to missing freerdp plugins:

LoadLibraryA: /usr/lib/x86_64-linux-gnu/freerdp/guacdr-client.so: cannot open shared object file: No such file or directory
guacd[7143]: WARNING:    Failed to load guacdr plugin. Drive redirection and printing will not work. Sound MAY not work.
LoadLibraryA: /usr/lib/x86_64-linux-gnu/freerdp/guacsnd-client.so: cannot open shared object file: No such file or directory
guacd[7143]: WARNING:    Failed to load guacsnd alongside guacdr plugin. Sound will not work. Drive redirection and printing MAY not work.


Start tomcat8 and guacamole-server:

ldconfig
systemctl start tomcat8
/etc/init.d/guacd start

Enable tomcat8 and guacd on startup:

systemctl enable tomcat8
systemctl enable guacd

You can now browse to guacamole using the following URL – note the trailing slash, without this you will get a HTTP 404 error!
http://localhost:8080/guacamole/

Not working? Stop guacd using the command:

systemctl stop guacd

Now, from the a terminal, start guacd with debug output enabled:

/usr/local/sbin/guacd -f -L debug

You can now try and connect to guacamole / a client and view debug information such as security / hostname / authentication failures.

Be sure to checkout my posts on how to proxy and secure guacamole either:

Also worth reviewing my post on using a mysql back-end as opposed to the user-mapping.xml file. This makes management and configuration of guacamole a lot easier, IMO.

Categories
Linux

Getting x11rdp working on Debian 8, Jessie, with the help of X11RDP-o-Matic

Note: there is currently a bug that stops X11RDP installation on Debian 8.7: https://github.com/scarygliders/X11RDP-o-Matic/issues/81

I recently posted about using RDP to connect to Debian 8 clients via xrdp and, things were going well until I tried to redirect session sound and then started looking into the default xrdp configuration; it turns out that the default xrdp package leveraged vnc… yes, vnc. Surely there has to be a more effective way…?

This got my looking at x11rdp, which can provide native RDP connectivity with the following benefits:

  • Redirected sound
  • Redirected clipboard (copy paste between remote host and client)
  • Better visuals / performance (YMMV)
  • (to follow) use of Remote-FX for improved video playback etc.

I came across Kevin Cave’s X11RDP-o-Matic, however this did not support Debian 8, but it gave me 90% of what I needed.

After a while of trying to figure out what was causing the script to fail on Debian 8, I submitted a pull request to modify the “required packages” associated with the “–withjpeg” compile flag. Until this is committed, in some form, I have created a modified copy of the main script here.

All of the below is performed and tested on a vanilla Debian 8.6 machine , via a remote SSH console – your mileage may vary should your configuration not match.

Pre-flight checks / pre-requisites

You’ll need to ensure you’re running KDE or XFCE. This will not work with GNOME.

I’ve used sudo throughout this post, so install and add your non root user to the group (alternatively get all of my code snips and remove sudo!) – git is also used from the offset, so I have included this here.

apt-get install -y sudo git
adduser <user account> sudo

Log off and login again via SSH to refresh your groups, allowing sudo to work.

Now update your Debian install prior to continuing to build and install x11rdp.

apt-get update
apt-get dist-upgrade -y

Download and Execute X11RDP-o-Matic

# Download X11RDP-o-Matic 
git clone https://github.com/scarygliders/X11RDP-o-Matic
cd X11RDP-o-Matic

# Download modified X11rdp-o-matic.sh and chmod +x
wget https://www.dropbox.com/s/obrg90m4djhb2ct/DEV-X11rdp-o-matic.sh
chmod +x DEV-X11rdp-o-matic.sh

# Build and install x11rdp and xrdp packages - this will take a while!
sudo ./DEV-X11rdp-o-matic.sh --interactive --withjpeg --withsimplesound --withpulse --withkerberos --withpamuserpass --withfreerdp

Fix anomalous “.service” files 

Comment out “EnvironmentFile” line and changing the PIDFile location for:

  • /lib/systemd/system/xrdp.service
  • /lib/systemd/system/xrdp-sesman.service
sudo sed -i 's/EnvironmentFile/#EnvironmentFile/g' /lib/systemd/system/xrdp-sesman.service

sudo sed -i 's/PIDFile=\/var\/run\/xrdp.pid/PIDFile=\/run\/xrdp.pid/g' /lib/systemd/system/xrdp-sesman.service

sudo sed -i 's/EnvironmentFile/#EnvironmentFile/g' /lib/systemd/system/xrdp.service

sudo sed -i 's/PIDFile=\/var\/run\/xrdp-sesman.pid/PIDFile=\/run\/xrdp-sesman.pid/g' /lib/systemd/system/xrdp.service

Now, reload service definitions and enable / start services.

sudo systemctl daemon-reload
sudo systemctl enable xrdp-sesman
sudo systemctl enable xrdp
sudo systemctl start xrdp-sesman
sudo systemctl start xrdp

Generate xrdp rsakeys.ini

Now, generate xrdp rsakeys.ini, without this you’ll be unable to connect and get errors in event /var/log/xrdp-sesman.log  as below:

  • [ERROR] Listening socket is in wrong state we terminate listener
  • XRDP cannot read file: /etc/xrdp/rsakeys.ini (check permissions)
sudo xrdp-keygen xrdp auto 2048 

Build Debian 8 pulseaudio xrdp sink modules

You should download the version of pulseaudio nearest to that in your disto – check using:

pulseaudio --version

Now, download the pulseaudio source and configure – note you do not have to make / make install pulseaudio.

Be sure to change the version number (5.0, in bold, below) to match that from the command above.

sudo apt-get install -y libjson0-dev libsndfile1-dev libspeex-dev libspeexdsp-dev libcap-dev

cd /tmp
wget https://freedesktop.org/software/pulseaudio/releases/pulseaudio-5.0.tar.gz
tar -zxvf pulseaudio-5.0.tar.gz
cd /tmp/pulseaudio-5.0
./configure

Now, build the modules and copy them to /usr/lib/pulse-5.0/modules and, finally for the xrdp sink modules, call them to /etc/pulse/default.pa.

Again, watch the version numbers / paths as you may need to change these for your build.

cd ~/X11RDP-o-Matic/work/xrdp/sesman/chansrv/pulse/

# Change the patch here to match your path
sudo sed -i 's/PULSE_DIR = \/home\/lk\/pulseaudio-1.1/PULSE_DIR = \/tmp\/pulseaudio-5.0/g' Makefile

sudo make
sudo cp *.so /usr/lib/pulse-5.0/modules/

cd ~
sudo cp /etc/pulse/default.pa ~
sudo sed -i -e '$amodule-xrdp-sink.so' /etc/pulse/default.pa
sudo sed -i -e '$amodule-xrdp-source.so' /etc/pulse/default.pa

Build .xsession Files

We now need to call the RDPsesconfig.sh script contained within the X11RDP-o-Matic package. This will build the .xsession file for all users.

I’d stress that feedback (from comments below) and my own experience shows that Gnome will not work via x11rdp, or xrdp for that matter. KDE and XFCE both work.

cd ~/X11RDP-o-Matic/
sudo ./RDPsesconfig.sh

Optional Steps

Fix en-GB keyboard layout:

wget https://www.dropbox.com/s/rtxp19ts17k8qy8/km-0809.ini
cp km-0809.ini /etc/xrdp/

sed -i '/\[default_rdp_layouts\]/a rdp_layout_gb=0x00000809' /etc/xrdp/xrdp_keyboard.ini

sed -i '/\[default_layouts_map\]/a rdp_layout_gb=gb' /etc/xrdp/xrdp_keyboard.ini

Set background colour of logon prompt to be black, not very light/ luminescent blue:

sed -i 's/ls_top_window_bg_color=009cb5/ls_top_window_bg_color=000000/g' /etc/xrdp/xrdp.ini

You can also remove unnecessary session options from xrdp-sesman as outlined below.

sudo vi /etc/xrdp/xrdp.ini
# manually remove lines associated with [xrdp2] to just before ["Session manager"] ; be sure to leave any lines including/onwards from  ["Session manager"]

Finally

Reboot your system, you should be able connect to your target system via RDP, with clipboard, audio and improved performance.

References


Categories
Linux

Installing Notepadqq on Debian 8, Jessie

Notepadqq is just like Notepad++ but for Linux rather than Windows.

Installing notepadqq on Debian 8 wasn’t as simple as I had expected as the PPA method threw-up a 404 error when I ran apt-get update. As a result, I opted for a download, compile and install method as outlined below.

First, download and install pre-reqs:

sudo apt-get install qt5-default libqt5webkit5 libqt5webkit5-dev qttools5-dev-tools libqt5svg5 libqt5svg5-dev git

Next, download notepadqq source itself:

git clone https://github.com/notepadqq/notepadqq.git

Finally, compile and install to /usr/local/lib/notepadqq:

cd notepadqq
./configure
make
sudo make install
Categories
Linux

Creating an “optimised” Debian UEFI / Gen2 Hyper-V Virtual Machine

First, we’ll use PowerShell to create your new Hyper-V VM. You’ll need to edit the variables at the top of this script (in bold) – note the size of the OS disk will be 32GB, you can change this, but will need to adjust partition layout / sizes accordingly.

# Change text in BOLD
$vmname = "DEBIAN" # Desired Virtual Machine Name
$vmpath = "E:\" # Root folder for Hypver-V VM (a folder will automatically be created for the VM itself)
$virtual_switch = "vSwitch" # Hypver-V Host vSwitch name to connect VM to
$netboot_iso = "C:\Users\chris\Downloads\debian-8.6.0-amd64-netinst.iso" # Debian Net Install ISO Path

# Create a new VHD:
New-VHD –Path "$vmpath\$vmname\Virtual Hard Disks\$vmname.vhdx" –SizeBytes 32GB –Dynamic –BlockSizeBytes 1MB

# Create the new VM:
New-VM -Name $vmname -MemoryStartupBytes 4096MB -Generation 2 -VHDPath "$vmpath\$vmname\Virtual Hard Disks\$vmname.vhdx" -SwitchName $virtual_switch
Add-VMDvdDrive $vmname 
Set-VMDvdDrive -VMName $vmname -Path $netboot_iso

# Disable secureboot the vm (will not boot from ISO without this):
Set-VMFirmware -VMName $vmname -EnableSecureBoot Off

# Disable Dynamic Memory (not supported by Debian):
Set-VMMemory $vmname -DynamicMemoryEnabled $false

# Now, power on the machine.
Start-VM -Name $vmname

Now, connect to the VM via the Hyper-V console and proceed to load the Debian setup wizard. Continue through the wizard until you are prompted to configure partitions / storage; at this point breakout to a new console (Ctrl-Alt F1).

Now we’ll manually define our partitions / desired filesystem based on the latest Microsoft recommendations here. Above, we created a 32GB VHD – if you changed this figure, change the commands below to suit. Where I have written “<default>” just hit enter. Note, you will wipe the drive this partition layout is applied to, you do this at your own risk.

Desired partition layout:

  • UEFI System Boot : 512MB
  • root / – ext4: 27GB
  • swap : <remaining space>

From your new console, use these commands:

fdisk /dev/sda
g
p
	n
	1
	<default>
	+512M
	t
	1

	n
	2
	<default>
	+27G

	n
	3
	<default>
	<default>
	t
	3
	14
w

Now, switch back to the Debian setup wizard and select “manual” for disk configuration / partitioning, then select each of the partitions and configure as below:

Partition 1: use as: UEFI System Partision (ESP)
Partition 2: use as: ext4, mount point "/"
Partition 3: use as: swap

Complete the installation as normal – you’re all done.

Categories
Linux

Debian Linux 8, Jessie, Managing and Troubleshooting Memory Consumption

I ran into some issues running Debian 8.6 on Hyper-V recently – my VM would run out of memory, run through a series of activities kill processes to try and self-heal and then, eventually, lock up entirely.

On reviewing the syslog I started to understand what was going on – the system was running out of memory:

sudo cat /var/log/syslog | grep memory

It looked as if, for whatever reason, wfica (the Citrix Receiver Client) couldn’t be “completely” killed to free-up memory; once killed more processes seemed to spawn which in turn would be killed, leading to more processes. Eventually more important system processes were killed to try and free-up memory:

Sep 30 11:42:15 debian kernel: [55556.844790]  [<ffffffff81142f43>] ? out_of_memory+0x473/0x4b0
Sep 30 11:42:15 debian kernel: [55556.844978] Out of memory: Kill process 9405 (clamd) score 72 or sacrifice child
Sep 30 11:52:15 debian kernel: [56156.791644]  [<ffffffff81142f43>] ? out_of_memory+0x473/0x4b0
Sep 30 11:52:15 debian kernel: [56156.791823] Out of memory: Kill process 8831 (wfica) score 30 or sacrifice child
Sep 30 11:52:15 debian kernel: [56156.792333]  [<ffffffff81142f43>] ? out_of_memory+0x473/0x4b0
Sep 30 11:52:15 debian kernel: [56156.792498] Out of memory: Kill process 8834 (threaded-ml) score 30 or sacrifice child
Sep 30 12:02:16 debian kernel: [56757.847752]  [<ffffffff81142f43>] ? out_of_memory+0x473/0x4b0
Sep 30 12:02:16 debian kernel: [56757.848397] Out of memory: Kill process 8853 (wfica) score 31 or sacrifice child
[...]
[...] # many more wfica processes killed, different PIDs
[...]
process 9238 (wfica) score 45 or sacrifice child
Sep 30 13:52:39 debian kernel: [63381.448595]  [<ffffffff81142f43>] ? out_of_memory+0x473/0x4b0
Sep 30 13:52:39 debian kernel: [63381.448762] Out of memory: Kill process 1147 (dropbox) score 18 or sacrifice child
Sep 30 13:53:17 debian kernel: [63419.152094]  [<ffffffff81142f43>] ? out_of_memory+0x473/0x4b0
Sep 30 13:53:17 debian kernel: [63419.152256] Out of memory: Kill process 8655 (shutter) score 10 or sacrifice child
Sep 30 13:53:21 debian kernel: [63423.078535]  [<ffffffff81142f43>] ? out_of_memory+0x473/0x4b0
Sep 30 13:53:21 debian kernel: [63423.078699] Out of memory: Kill process 1071 (Xvnc) score 10 or sacrifice child
Sep 30 13:57:26 debian kernel: [63666.800723]  [<ffffffff81142f43>] ? out_of_memory+0x473/0x4b0
Sep 30 13:57:26 debian kernel: [63666.800914] Out of memory: Kill process 852 (lightdm-gtk-gre) score 3 or sacrifice child
Sep 30 13:57:26 debian kernel: [63666.820658]  [<ffffffff81142f43>] ? out_of_memory+0x473/0x4b0
Sep 30 13:57:26 debian kernel: [63666.820787] Out of memory: Kill process 581 (Xorg) score 2 or sacrifice child
Sep 30 13:57:26 debian kernel: [63668.058072]  [<ffffffff81142f43>] ? out_of_memory+0x473/0x4b0
Sep 30 13:57:26 debian kernel: [63668.058324] Out of memory: Kill process 501 (freshclam) score 0 or sacrifice child
Sep 30 13:57:26 debian kernel: [63668.065610]  [<ffffffff81142f43>] ? out_of_memory+0x473/0x4b0
Sep 30 13:57:27 debian kernel: [63668.065906] Out of memory: Kill process 3727 (AuthManagerDaem) score 0 or sacrifice child
Sep 30 13:57:29 debian kernel: [63668.256015]  [<ffffffff81142f43>] ? out_of_memory+0x473/0x4b0
Sep 30 13:57:29 debian kernel: [63668.256217] Out of memory: Kill process 9143 (AuthManagerDaem) score 0 or sacrifice child
Sep 30 13:57:29 debian kernel: [63668.872898]  [<ffffffff81142f43>] ? out_of_memory+0x473/0x4b0
Sep 30 13:57:30 debian kernel: [63668.873008] Out of memory: Kill process 192 (systemd-journal) score 0 or sacrifice child
Sep 30 13:57:30 debian kernel: [63669.939297]  [<ffffffff81142f43>] ? out_of_memory+0x473/0x4b0
Sep 30 13:57:30 debian kernel: [63669.939437] Out of memory: Kill process 552 (polkitd) score 0 or sacrifice child
Sep 30 13:57:30 debian kernel: [63669.943290]  [<ffffffff81142f43>] ? out_of_memory+0x473/0x4b0
Sep 30 13:57:30 debian kernel: [63669.943387] Out of memory: Kill process 502 (NetworkManager) score 0 or sacrifice child

In terms of cause, this was simple, Debian 8 doesn’t support Hyper-V Dynamic Memory: https://technet.microsoft.com/en-us/windows-server-docs/compute/hyper-v/supported-debian-virtual-machines-on-hyper-v

However, this got me thinking, coming from a Windows background, about how to monitor / review consumption of resources.

To view memory consumption, by process, sorted high > low:

top -o %MEM

Review syslog for out of memory events:

sudo cat /var/log/syslog | grep memory

To view virtual memory consumption:

vmstat

To view CPU utilisation, by process, sorted high > low:

top -o %CPU

To view disk utilisation:

sudo apt-get install sysstat
iostat -d #for physical disks
iostat -N #for LVM

[more to come]

Categories
ICA Client Linux

Debian 8, Jessie, Installing Citrix Receiver

Download the Citrix Receiver Client from here: https://www.citrix.com/downloads/citrix-receiver/linux/receiver-for-linux-latest.html

Now install the client using the commands:

sudo dpkg -i ~/Downloads/icaclient_*.deb ctxusb_*.deb
sudo apt-get -f install # Install missing depends.

Next, configure the client:

sudo /opt/Citrix/ICAClient/util/configmgr &

Without executing this command I would get a brief pop-up and then the Citrix client would simply disappear – no errors were displayed.

Using FireFox? Check here for specific instructions: https://help.ubuntu.com/community/CitrixICAClientHowTo#A7._.2864-bit_only.29_Fix_Firefox_plugin_installation

SSL configuration for GlobalSign SSL (if you’re using a different CA you can skip this / retrofit to meet your needs).

Download GlobalSign Root CA crt files from: https://support.globalsign.com/customer/en/portal/articles/1426602-globalsign-root-certificates

wget https://secure.globalsign.net/cacert/Root-R1.crt
wget https://secure.globalsign.net/cacert/Root-R2.crt
wget https://secure.globalsign.net/cacert/Root-R3.crt

Convert to PEM format using openSSL:

openssl x509 -inform DER -in Root-R1.crt -out Root-R1.pem -outform PEM
openssl x509 -inform DER -in Root-R2.crt -out Root-R2.pem -outform PEM
openssl x509 -inform DER -in Root-R3.crt -out Root-R3.pem -outform PEM

Copy these to: /opt/Citrix/ICAClient/keystore/cacerts

sudo cp *.pem /opt/Citrix/ICAClient/keystore/cacerts/

Rehash the ICA Client certificates:

sudo c_rehash /opt/Citrix/ICAClient/keystore/cacerts/

Citrix “official” instruction are available here: http://docs.citrix.com/en-us/receiver/linux/13/linux-secure-wrapper/linux-secure-connect-secure-gateway-ssl-relay.html

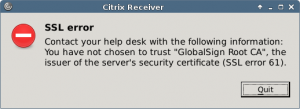
If you get SSL Error 61 :: “Contact your help desk with the following information: You have not chosen to trust “GlobalSign RootCA”, the issuer of the server’s security certificate (SSL error 61).”

citrix-receiver_001

You haven’t imported / rehashed the necessary SSL certificates for your servers certificate.

Categories
Microsoft

Microsoft Local Administrator Password Solution (LAPS)

Managing local Administrator passwords on computers can be painful, especially in a large estate. Good practice is for each device to have its own, unique, local Administrator password to stop “lateral movement” of malware / reduce risk – in practice, few organisations actually achieve this.

I recently came across a Microsoft solution geared towards addressing  this problem – the Local Admin Password Solution:

The “Local Administrator Password Solution” (LAPS) provides management of local account passwords of domain joined computers. Passwords are stored in Active Directory (AD) and protected by ACL, so only eligible users can read it or request its reset.

In terms of supported operating systems, at time of writing requirements are very flexible in respect of DCs and target Operating Systems:

Active Directory:
> Windows 2003 SP1 and above

Managed machines:
> Windows Vista with current SP or above; x86 or x64
> Windows 2003 with current SP and above; x86 or x64 (Itanium not supported)

For more information, and, to download the tool itself click here: https://www.microsoft.com/en-us/download/details.aspx?id=46899

Categories
ConfigMgr

ConfigMgr : Adding KMDF 1.11 (KB2685811) to Build and Capture Taks Sequences

Download the KMDF 1.11 driver for X86 and X64 architectures using this link: https://support.microsoft.com/en-us/kb/2685811

Extract the MSU files using the commands:

mkdir C:\Temp
mkdir C:\Temp\Windows6.1-KB2685811-x86\"
mkdir C:\Temp\Windows6.1-KB2685811-x64\"

expand –f:* kmdf-1.11-Win-6.1-x86.msu "C:\\Temp\Windows6.1-KB2685811-x86\\"
expand –f:* kmdf-1.11-Win-6.1-x64.msu "C:\\Temp\\Windows6.1-KB2685811-x64\\"

Create a ConfigMgr package (not Application) as indictaed below:

Package name: Microsoft KMDF 1.11 Hotfix

Folder structure / contents:
\X86\Windows6.1-KB2685811-x86.cab (extracted from downloaded MSU, as above)
\X64\Windows6.1-KB2685811-x64.cab (extracted from downloaded MSU, as above)

Ensure content for this package is distributed to all of your DPs prior to continuing.

Now we will modify your “Build and Capture” Task Sequence.

Create a new folder/ group just prior to the “Setup Windows and Configuratipn Manager” task:

kmdf

Below, I have detailed actions for x64 architecture, replace X64 with X86 for 32-bit.

This group will contain two actions:

Run Command Line: Create Temp Folder
Command: cmd.exe /c mkdir %OSDSystemDrive%\Temp
Package: No Package

Run Command Line: Inject KMDF 1.11 x64
Command: cmd.exe /c X:\windows\system32\dism.exe /ScratchDir:%OSDSystemDrive%\Temp /Image:%OSDSystemDrive%\ /Add-Package /PackagePath:%_SMSTSMDataPath%\Packages\M010038D\X64\Windows6.1-KB2685811-x64.cab
Package: Microsoft KMDF 1.11 Hotfix

This driver will now be injected automatically everytime you re-create your master image via the Buld and Capture Task Sequence.