In this article I’ll cover setup of an internal NetScaler VPX Load Balancer for Storefront 1.1. Note that this configuration will also work with Storefront 1.0, just the Storefront MMC snap-in doesn’t work as-of the 1st April this year!
Use the following article to install and configure Storefront for internal use first.
Contents
2. SSL Certificate Requirements
1. Lab Environemnt
The environment for this example configuration is as follows:
- CTX1.domlocal.net – 192.168.0.102/24 – Citrix XenApp 6.5 Server with Storefront 1.1 Locally Installed (in a production environment I would seperate Storefront onto it’s own server)
- CTX2.domlocal.net – 192.168.0.102/24 – Citrix XenApp 6.5 Server (as above!)
- Two-arm NetScaler HA Pair also using VMAC’s:
- NS1 – 192.168.0.230/24
- NS2 – 192.168.0.231/24
I have allocated 192.168.0.247/24 as the Load Balancer IP address for Storefront.
I’m using an Internal IP address for the Load Balancer, this could equally be an external IP address (an IP address that corresponds to a NIC other than the one that the NetScaler IP is served from).
2. SSL Certificate Requirements
I woud suggest you generate or purchase a SAN SSL certificate for the Load Balancer Virtual Server. In this lab environment I’m using the following Subject Names:
- ctx1.domlocal.net
- ctx2.domlocal.net
- ctx1
- ctx2
- ctx.domlocal.net
- ctx
As I plan on using the LB internally only an internal PKI/AD CS certificate is fine, even for my Access Gateway setup as it’s the endpoint connetcion SSL certificate that is key. Importantly, all internal devices trust the RootCA, hence the issued cert will work as required.
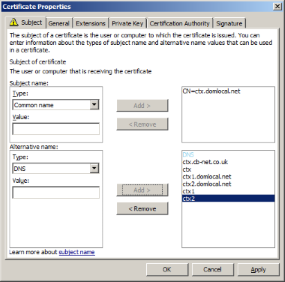
The image below shows I’m using a Common Name of ‘ctx.domlocal.net’ for the Certificate Subject name, with DNS Alternative Names (including ctx.domlocal.net and those listed above) :

3. Service Group Definition
Browse to Load Balancer > Service Groups and click ‘Add…’ at the bottom of the window.
Enter a name of Storefront_SSL and select SSL as the protocol, then for each server add the Storefront Server IP address with a port of 443.

Add the https-ecv montior then click OK to create the Service Group:

Under Advanced enable the Compression override:

Note; You don’t need to add the SSL Certificate to the Service Group, we’ll add it to the Virtual Server in a minute.
4. Virtual Server Definition
Browse to Load Balancer > Virtual Server and click ‘Add…’ at the bottom of the window.
Set Protocol as SSL and add an IP address, in this example 192.168.0.247:

Add the Service Group you just defined.

Under LB Method select Least Connection & under persistance set SOURCEIP:
Finally, bind the SSL Certificate you imported for the Storefront Server to the Virtual Server

5. DNS Configuration
Create a DNS A Record that matches the name of a SAN in your certificate; the IP address for the record is that of your Virtual Server. For this lab I created; ctx.domlocal.net 192.168.0.247

All receiver clients should be configured ot use this DNS name.
6. Testing
Confirm you can browse to the StoreFront URL (note that you will have to enter the complete URL, not just the FQDN). In this example I’d browse to http://ctx.domlocal.net/Citrix/CB-NetStoreWeb
Confirm that you can point the receiver client at the Load Balancer and it works as expected.
Create an account; enter the URL as https://ctx.domlocal.net

Logon (I haven’t configured SSO yet):

Test access to applications:
