Categories
Exchange Server 2007

Exchange 2007 Split Permissions

Exchange 2007 Split Permissions

During the migration/centralisation project I’ve been involved in recently, one of our challenges was delegation of Exchange object management on a per-site or per-country level.

Our goal was to allow local IT teams at each site to create and manage user mailboxes and distribution groups, without having the ability to affect users at other sites and also allowing for centralised management of hardware, backups etc. Now Exchange 2007 doesn’t cater for this permission model out-of-the-box. This type of permissions configuration is referred to as a ‘split permissions’ model.

The Exchange Management Shell allows granular control of permissions at both the AD and Mailbox level. Initial investigation led me to the following command for user management:

Remove-ADPermission -Identity “OU=DE,DC=mydom,DC=com” -User “MYDOM\DE Mailbox Admins” -AccessRights ReadProperty, WriteProperty -Properties Exchange-Information, Exchange-Personal-Information, legacyExchangeDN, displayName, adminDisplayName, displayNamePrintable, publicDelegates, garbageCollPeriod, textEncodedORAddress, showInAddressBook, proxyAddresses, mail 

Users of the DE Mailbox Admins group were also granted rights to Create and Delete User Objects on the “OU=DE,DC=mydom,DC=com” container and all sub-containers.

This however did not provide management of Distribution Groups. In order to achieve this the following shell command is necessary:

ADPermission -Identity “OU=DE,DC=mydom,DC=com” -User “MYDOM\DE Mailbox Admins” -AccessRights GenericAll -ChildObjectTypes msExchDynamicDistributionList

The Exchange Management Tools come with a script which integrates the above commands into a single command:

ConfigureSplitPerms.ps1 -user “DE Mailbox Admins” -identity “OU=DE,DC=mydom,DC=com”

Finally, the only remaining permission required in our environment was the delegation of Public Folder administrative rights. Again, the following shell command can be used to delegate these on a public folder and all of its sub-folders:

Get-PublicFolder “\DE\” –recurse  | Add-PublicFolderAdministrativePermission -User “DE Mailbox Admins” -AccessRights AllExtendedRights -Inheritance SelfAndChildren


Update 12/01/2010: In order to delegate the “Manage Full Mailbox Access” and “Manage Send As Permissions” use the following ExchangeShell command:

Add-ADPermission -identity (Get-MailboxDatabase “\\“).distinguishedName -user “” -ExtendedRights ms-Exch-Store-Admin
Categories
Exchange Server 2007

Exchange 2007 550 5.7.1 Unable To Relay

Exchange 2007 550 5.7.1 ‘Unable To Relay’

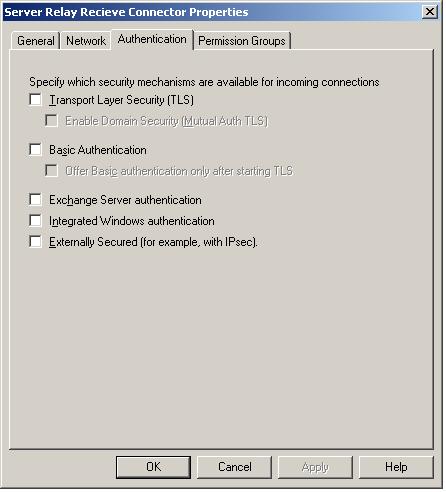
In order to create an SMTP Receive Connector in Exchange 2007 which will allow anonymous SMTP servers within your network to connect and relay mail you will need to complete the following configuration steps.

First, create you Receive Connector as follows, ensuring the ‘Anonymous users’ option is selected inn the ‘Permissions groups’ tab.

The ‘Network’ configuration of this connector limits access to a partiicular server thus preventing unauthorised relay of email:

Finally, the most important stage of this configuration, execute the following shell command using the Exchange Management Sell (EMS), replacing ‘HT_Server_Name’ with the machine name of the Hub Transport Server you configured the new recieve connetcor on:

Normal 0 false false false EN-GB X-NONE X-NONE MicrosoftInternetExplorer4 /* Style Definitions */ table.MsoNormalTable {mso-style-name:”Table Normal”; mso-tstyle-rowband-size:0; mso-tstyle-colband-size:0; mso-style-noshow:yes; mso-style-priority:99; mso-style-qformat:yes; mso-style-parent:””; mso-padding-alt:0cm 5.4pt 0cm 5.4pt; mso-para-margin:0cm; mso-para-margin-bottom:.0001pt; mso-pagination:widow-orphan; font-size:11.0pt; font-family:”Calibri”,”sans-serif”; mso-ascii-font-family:Calibri; mso-ascii-theme-font:minor-latin; mso-fareast-font-family:”Times New Roman”; mso-fareast-theme-font:minor-fareast; mso-hansi-font-family:Calibri; mso-hansi-theme-font:minor-latin; mso-bidi-font-family:”Times New Roman”; mso-bidi-theme-font:minor-bidi;}

Get-ReceiveConnector “HT_Server_Name\Server Relay Receive Connector” | Add-ADPermission -User “NT AUTHORITY\ANONYMOUS LOGON” -ExtendedRights “ms-Exch-SMTP-Accept-Any-Recipient”


Categories
Windows Server 2003

Group Policy Disable Removable Storage Access

Nowadays all security audits will raise the issue of removable storage access. Are you restricting access to Floppy, LS120, CDROM and USB removable storage media? If the answer is no then the ADM file which is availble form this article will help you to resolve that.

Download the adm file here.

Simply add this ADM file to the computer administrative templatesto be able to restrict access to USB drives, CDROM, Floppy and LS-120 drives.

CLASS MACHINE
CATEGORY !!category
 CATEGORY !!categoryname
  POLICY !!policynameusb
   KEYNAME “SYSTEM\CurrentControlSet\Services\USBSTOR”
   EXPLAIN !!explaintextusb
     PART !!labeltextusb DROPDOWNLIST REQUIRED
 
       VALUENAME “Start”
       ITEMLIST
        NAME !!Disabled VALUE NUMERIC 3 DEFAULT
        NAME !!Enabled VALUE NUMERIC 4
       END ITEMLIST
     END PART
   END POLICY
  POLICY !!policynamecd
   KEYNAME “SYSTEM\CurrentControlSet\Services\Cdrom”
   EXPLAIN !!explaintextcd
     PART !!labeltextcd DROPDOWNLIST REQUIRED
 
       VALUENAME “Start”
       ITEMLIST
        NAME !!Disabled VALUE NUMERIC 1 DEFAULT
        NAME !!Enabled VALUE NUMERIC 4
       END ITEMLIST
     END PART
   END POLICY
  POLICY !!policynameflpy
   KEYNAME “SYSTEM\CurrentControlSet\Services\Flpydisk”
   EXPLAIN !!explaintextflpy
     PART !!labeltextflpy DROPDOWNLIST REQUIRED
 
       VALUENAME “Start”
       ITEMLIST
        NAME !!Disabled VALUE NUMERIC 3 DEFAULT
        NAME !!Enabled VALUE NUMERIC 4
       END ITEMLIST
     END PART
   END POLICY
  POLICY !!policynamels120
   KEYNAME “SYSTEM\CurrentControlSet\Services\Sfloppy”
   EXPLAIN !!explaintextls120
     PART !!labeltextls120 DROPDOWNLIST REQUIRED
 
       VALUENAME “Start”
       ITEMLIST
        NAME !!Disabled VALUE NUMERIC 3 DEFAULT
        NAME !!Enabled VALUE NUMERIC 4
       END ITEMLIST
     END PART
   END POLICY
 END CATEGORY
END CATEGORY
 
[strings]
category=”Custom Policy Settings”
categoryname=”Restrict Drives”
policynameusb=”Disable USB”
policynamecd=”Disable CD-ROM”
policynameflpy=”Disable Floppy”
policynamels120=”Disable High Capacity Floppy”
explaintextusb=”Disables the computers USB ports by disabling the usbstor.sys driver”
explaintextcd=”Disables the computers CD-ROM Drive by disabling the cdrom.sys driver”
explaintextflpy=”Disables the computers Floppy Drive by disabling the flpydisk.sys driver”
explaintextls120=”Disables the computers High Capacity Floppy Drive by disabling the sfloppy.sys driver”
labeltextusb=”Disable USB Ports”
labeltextcd=”Disable CD-ROM Drive”
labeltextflpy=”Disable Floppy Drive”
labeltextls120=”Disable High Capacity Floppy Drive”
Enabled=”Enabled”
Disabled=”Disabled”


Categories
Exchange Server 2007

Exchange 2007 Recursive Public Folder Permissions

Setting Recursive Public Folder Permissions in Exchange Server 2007

As you may have noticed by now, public folder client permissions cannot be set using the Exchange Server 2007 Public Folder Management MMC snap-in. You are only able to achieve this by using the Exchange Management Shell.

Setting individual public folder permissions can be achieved using the following command:

Add-PublicFolderClientPermission “\UK” -User “User1” -AccessRights PublishingEditor

Setting recursive public folder permissions, i.e. permissions that propagate from a parent folder to its sub folders is not as obvious. Microsoft has included a script with the Exchange Server 2007 Management tools to make this possible. An example of how to use this script is detailed below:

foreach ( $mbx  in(“user1”,”user2″,”user3″)) { AddUsersToPFRecursive.ps1 –TopPublicFolder  “’\UK\Test Folder 1” –User $mbx –Permissions PublishingEditor }

This command will grant ‘Publishing Editor’ permissions on the ‘\UK\Test Folder1’  for user1, user2 and user3. The number of users is not limited. Just ensure you encapsulate the users in speech marks and separate them by commas.

It is import to encapsulate the public folder name using both ” and ‘ characters. For example ” ‘test folder’ “. If you do not use both characters you will recive errors when using this script. The error will read something like:

Get-PublicFolder : A parameter cannot be found that matches parameter name  ‘Folder1’

This is because a space follows ‘\UK\Test’

Categories
Windows Server 2003

MMC cannot open the file C:WINDOWSsystem32gpmc.msc : FIX

MMC cannot open the file C:\WINDOWS\system32\gpmc.msc

If you are receiving the following error:

GPMC Error

Simply browse to the following directory, replacing *User_Name* with the affected users sAMAccountName:

C:\Documents and Settings\*User_Name*\Application Data\Microsoft\MMC

Then delete the ‘gpmc’ file. This will reset the gpmc console to its original configuration, but allow you to use it!

Categories
SQL

SQL : SQL Transaction Log File Full Resolution

SQL Transaction Log File Full Resolution

In the event you recieve the following notification on a SQL server:

Error: 9002, Severity: 17, State: 6
The log file for database ‘DB_Name’ is full. Back up the transaction log for the database to free up some log space. 

The following SQL code will dump the transaction log and shrink the transaction log file:

sp_helpdb db_name

       USE db_name

GO

BACKUP LOG db_name WITH TRUNCATE_ONLY

DBCC SHRINKFILE (db_name_log, TRUNCATEONLY)

Use the command below to set a simple recovery mode if desired – this will stop this happening again but will stop you being able to perform a point in time recovery:

ALTER DATABASE db_name SETRECOVERY SIMPLE

Once this process has been performed you should ensure a full backup is taken of the database.