I’ve spent recent weeks (months even!) looking at how I can bring simple automation and voice control to my home. In my quest to create a “Smart Home” I came across the Sonoff T1 UK-specification wall switch. At just ~£15 and when coupled with Tasmota, an Open Source firmware (from what I have read, I wouldn’t consider using the native firmware) that is suitable for a variety of ESP powered devices, this wi-fi connected switch becomes a very compelling product.
I’ve now got a bunch of these around the house, integrated with the Node Red Alexa Smart Skill v3 Bridge. Over the last three months these have proven to be very reliable (faultless actually) and very effective when paired with the custom multi-sensors I have built using ESP8266 NodeMCU boards to drive automation. I figured I would share my experience/ how I got them up and running.
Note that this guide assumes you have a secure MQTT server available for use, and Node-RED deployed should you want to take advantage of the Node Red Alexa Smart Skill v3 Bridge. If you’ve not got either of these in-place watch this space – further guides to follow.
Check your Wiring
Always switch off the mains when removing face-plates or performing any work on your light switches.
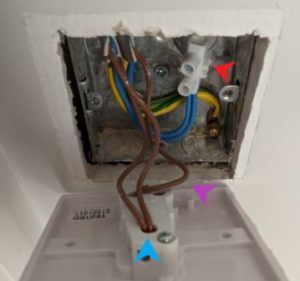
Wiring standards in the UK are also a real issue for Smart Switches. I’m lucky enough to live in a new home (<5 years old at time of writing), meaning I have neutral (red arrow in image below) wires at the switch, along with common (light blue arrow) and switched live (purple arrow) plus earth. Wherever you are located, before you start down the path of smart light switches check your wiring! This may considerably limit your choices.
Flashing the T1 with Tasmota
Never try to open or connect your FTDI/ jumper cables to a Sonoff devices whilst it has mains power attached. You could be severely injured and/ or die.
I’ve flashed a number of these devices now, using the process outlined below every time. Before you proceed:
- Download Tasmota from GitHub and extract to a folder on your device – we need to change a couple of files before we flash the Sonoff T1.
- Download and Install Visual Studio Code and install the Platform IO extension.
Open the Device and Connect FTDI Adaptor
First, you’ll need to purchase an FTDI adaptor, I use a CP2102 device purchased from eBay (I have no affiliation with the seller, buy whichever FTDI adaptor you want!). Ensure that you install the driver(s) required for your FTDI adaptor before proceeding.
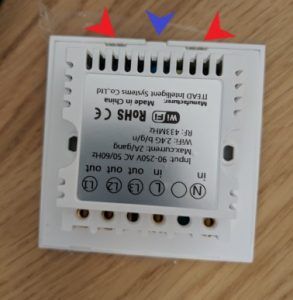
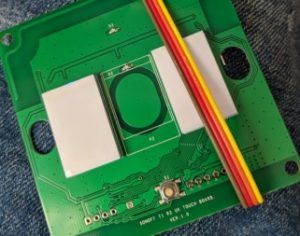
The Sonoff T1 is easy to get into, simply use a small flat-headed screwdriver to pry open where the red arrows indicate. Be careful not to slip as you can easily scratch the paint on the inside of the glass front.
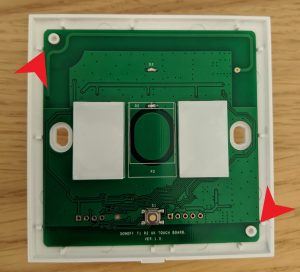
You can remove the ESP board by simply getting your fingernail under one of the corners (red arrows) and applying a small amount of leverage.
Connect your FTDI adaptor as shown below (last pin is not used) – ensure your FTDI adaptor is not connected to your computer yet. Note you should only use 3.3v, not 5v, when connecting your FTDI adaptor, should you accidentally use 5v you’ll need to order another T1 device!
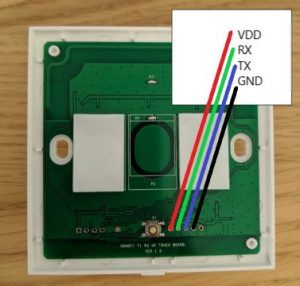
I found that I could simply wrap the jumper cables around the device in order to maintain a sufficiently good connection: no need to solder anything.
The hardware is all set to flash! Time to get our Tasmota customisations ready.
Prepare Tasmota User Config
I opt to pre-set all of the wireless, MQTT, web interface username and password via a user_config_override.h file. You can find the configuration I use on GitHub.
Copy the user_config_override.h file under the “sonoff” folder in your extracted Tasmota folder. You’ll also need to modify user_config.h to enable the use of the override file – find this line in modify user_config.h and uncomment:
//#define USE_CONFIG_OVERRIDE // Uncomment to use user_config_override.h file. See README.md
The final change required before we can flash Tasmota is to modify the platformio.ini file – specifically
- Find the [platformio] section near the top of the file and uncomment (remove the semi-colon) the line “env_default = sonoff” – ensure all other lines (firmware-varients) are commented.
- Next. find the [common] section and uncomment “platform = [email protected]” – ensure all other platforms are commented
- Finally, find the line that specifies upload_port and set to the correct COM port of your FTDI adaptor.
Boot your Sonoff T1 into Flash Mode
This is a little like a game of twister:
- plug-in your FTDI adapater whilst holding the Reset Button
- press and release Touch Pad 1 (only button on a one-gang model, or left-most button on a two/ three-gang).
The top LED will not be lit and BOTH touch pads will be very dimly lit.
Flashing Time!
Use the upload button at the bottom of the Visual Stuido Code/ Platform IO window to upload Tasmota to your Sonoff T1.

Once the process is completed check your router/ AP for the IP address given to the device. Browse to the device IP and login using the credentials you set in the user_config_override.h file. The final tasks here are:
- Set the module type, browse to Configuration | Configure Module | Set Type to “Sonoff T1 <# of Channels>” – the Sonoff T1 will reboot and will then show the correct power button options.
- Configure SetOpition13 to speed-up capacitive button response time. Browse to the console of the device and enter the command:
SetOption13 1
MQTT Integration, Node-RED and Home Assistant
More to follow on this, when I finish the posts on Mosquitto MQTT setup and Node-RED setup I’ll update this guide. For now, this post assumes you have both of these up and running, and that by configuring the MQTT device ID in the user_config_override.h file, you know how to integrate the Sonoff T1 into your environment.
Note, that if you are using Home Assistant, the supplied user_config_override.h file enables automatic discovery of the Sonoff T1 in your environment – enjoy!
Closing Thoughts
Pros
- The device itself looks sleek/ modern when fitted. Whether this is a good or bad thing will, of course, vary based on your decor.
- Quality-wise, I have nothing bad to say after three months use. Software-wise I’m not getting any random reboots/ commands that are ignored, but that said if I was it wouldn’t be down to the Sonoff T1 (I’m running custom firmware now remember!). Hardware wise, the Sonoff T1 seems well built – only time will tell here!
- The capabilities a smart switch offers. In terms of integration with Alexa, MQTT and the multi-sensors that trigger power events based on motion/ no motion and or light levels is, frankly, awesome. This definitely passes the wife test, and actually drove a faster adoption of the Sonoff T1 around the house.
Cons
- This isn’t a consumer-grade solution or product. Firmware flashing, Node-RED flows, MQTT deployment etc, it’s not going to be for everyone (or even most!). The Sonoff T1 has CE certification but for many this will not be enough for them to trust the device in their home. Will all of that said, you really don’t need to be a rocket scientist to get this stuff working!
- The capacitive buttons aren’t great – you have to be quite precise with your presses, and as there is nothing to “feel” this can be a pain. As we are using voice/ senor driven switching primarily this is not a huge problem for me.
- There is no Sonoff dimmer available (at time of writing). For now I am using one of these Tuya dimmers in the two rooms where I needed dimming. These units will also takes a slightly modified version of the the Tasmota firmware and thus integrates into Node-RED flows/ the Node Red Alexa Smart Skill v3 Bridge. I’ll be sharing a shorter version of this post on the device in the near future.