Categories
Windows 2008

Server Core : Query the Event Log from the Command Line

Server Core : Query the Event Log from the Command Line

Use the following command to list events in the SYSTEM event log between 9th March 00:00 to 15:00:

{code lang:css showtitle:false lines:false hidden:false}wevtutil qe system “/q:*[System[TimeCreated[@SystemTime>=’2012-03-09T00:00:00′ and @SystemTime<‘2012-03-09T15:00:00’]]]” /f:text{/code}

Use the following command to query the SYSTEM event log for any event at or after midnight on 12th March:

{code lang:css showtitle:false lines:false hidden:false}wevtutil qe system “/q:*[System[TimeCreated[@SystemTime>=’2012-03-12T00:00:00′]]]” /f:text{/code}


Categories
General

Vyatta : Interfaces Become Unresponsive

Note When Vyatta Core got discontinued, a group of its users who wanted to keep using it forked the last available source code to start VyOS. See more here: https://vyos.io/

I recently deployed a Vyatta router into a Hyper-V test environment to connect multiple host-only networks and provide Internet access. The deployment was a success and is detailed here.

I found that after a large file transfer (download) or 3 or 4 days of use one or more of the interfaces on the Vyatta device would stop responding. Using tcpdump I found that the traffic siomply was not reaching the interface(s) that had stopped working: sudo tcpdump -nvi eth1

Intially I wondered if the VM was running low on memory; I had assigned only 128MB of RAM, so increased this to 256MB only to expereicne the same issues a few days later. I then came across trhe following forum post http://www.vyatta.org/forum/viewtopic.php?t=6221&sid=a15464ed60549a515c43bca4c26909b7 which described my issue perectly. The solution? Configure the VM to have 2 vCPU’s – ever since the Vyatta virtual router has been stable.

Categories
Exchange Server 2010

Exchange 2010 : DAG – Move Primary Active Manager

Exchange 2010 : DAG – Move Primary Active Manager

To view the current Primary Active Manager use the following command:
{code lang:css showtitle:false lines:false hidden:false}get-databaseavailabilitygroup <name> -status | select name,primaryactivemanager{/code}

From one of the DAG members run the command: cluster group
This will show the “Cluster Group” owner is the Primary Active Manager.

To move the PAM, use the command below from one of the DAG members – note when tested this did not affect Exchange resources – your mileage may vary;
{code lang:css showtitle:false lines:false hidden:false}cluster group “Cluster Group” /MoveTo:<DAG Server Name>{/code}

Categories
Exchange Server 2010

Exchange 2010 : Moving Passive Database Copies to a different DAG Server

Exchange 2010 : Moving Passive Database Copies to a different DAG Server

I recently encountered a requirement to move several passive database copies, each of approx 200GB in size to differnet servers. Ideally I wanted to acheieve this withought having to re-seed the databases. I wanted to try and leverage database portability in some respects, keeping the existing data and simply presenting the disks containing that data to the new DAG server. Here’s how this was acheived:

Prepare your target server;

  • The server should be a member of the same DAG as the source
  • The server should be able to connect to the same disks (although do not do this yet)

Moving the Database Copies

Step 1: Suspend the Mailbox Database Copy
Step 2: Remove the Mailbox Database Copy (the database and log files will be left on the drives)
Step 3: Disconnect the LUN’s from the original server (DO NOT FORMAT/DELETE the disks)
Step 4: Present the same disks to the new server, again do not format or repartition.
Step 5: Add the mailbox database copy;

{code lang:css showtitle:false lines:false hidden:false}add-mailboxdatabasecopy -id “database name” -mailboxserver “DAG server name” -seedingpostponed:$true{/code}

Step 6: Resume the mailbox database copy:

{code lang:css showtitle:false lines:false hidden:false}resume-mailboxdatabasecopy “database name”\”DAG server name”{/code}

Step 7: Confirm the copy status:

{code lang:css showtitle:false lines:false hidden:false}Get-MailboxDatabaseCopyStatus “database name”{/code}

If the new copy is stuck in ‘Resynchronizing’ then suspend the copy and resume it.

Equally speaking you could restore a backup or use a VSS snapshot of the databases as outlined in the following article:
http://blogs.technet.com/b/timmcmic/archive/2011/07/12/exchange-2010-using-vss-to-perform-an-online-offline-database-seed.aspx

Once you have moved the passive database copy, you can activate it and perform the same steps to move the now passive copy on the other server(s).

Categories
General

Vyatta : Configuring a Virtual Router

Note When Vyatta Core got discontinued, a group of its users who wanted to keep using it forked the last available source code to start VyOS. See more here: https://vyos.io/

Vyatta is a router that can be used in a Hyper-V or ESX Virtual machine and is available for download Vyatta Download. I’ve used this to connect host-only networks in order to create valid test environments, an example configuration is illustarted and detailed below.

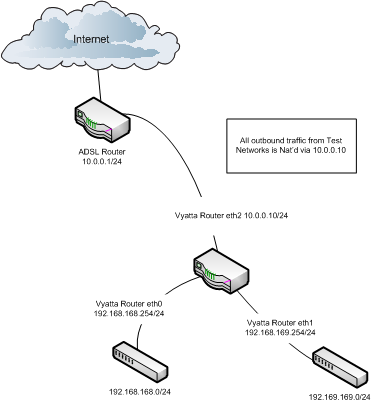
In order to implement the above configuration on the Vyatta virtual router follow the configuarion steps outlined below. For reference the default username / password is vyatta / vyatta.

Ensure that VM has 2 vCPU’s – with a single vCPU the interfaces can become unresponsive as per; http://www.vyatta.org/forum/viewtopic.php?t=6221&sid=a15464ed60549a515c43bca4c26909b7.

Under Hyper-V I can confirm this stable with 2 vCPU, 256MB RAM – your mileage may vary.

Deploy image to local drive:
install system

Once rebooted, login and enter configuration mode:
configure

Configure ethernet interfaces:
set interfaces ethernet eth0 address 192.168.168.254/24
set interfaces ethernet eth0 description “Network1”
set interfaces ethernet eth1 address 192.168.169.254/24
set interfaces ethernet eth1 description “Network2”
set interfaces ethernet eth2 address 10.0.0.10/8
set interfaces ethernet eth2 description “Internet”

Configure default gateway:
set system gateway-address 10.0.0.1

Configure DNS server:
set system name-server 8.8.8.8

Configure NAT Rule to masquaerade all traffic as the Vyatta device on the ‘external’ interface:
set nat source rule 20 source address 192.168.0.0/16
set nat source rule 20 outbound‐interface eth1
set nat source rule 20 translation address masquerade

Save/Commit:
commit
save

Exit Configuration mode:
exit

show interfaces ethernet
show system default-gateway
show nat rules
show nat statistics

Now run some basic connectivity tests to ensure:

  1. You can connect to the different subnets
  2. You can connect to the internet
Categories
Windows 2008

Windows 2008 : Export Event Log Using wevtutil

Windows 2008 : Export Event Log Using wevtutil

Use the following command to quickly export the SYSTEM event log from your server, this can also be used in a scheduled task to archive event logs:

wevtutil epl SYSTEM C:\ApplicationLog.evt

To export the APPLICATION event log use the command:

wevtutil epl APPLICATION C:\ApplicationLog.evt

Categories
Windows 2008

Windows 2008 : Renaming the Local Administrator Account

Windows 2008 : Renaming the Local Administrator Account

Recently I was looking into an issue where a Group Policy Preferences setting to rename the administrator (buil-tin) account was generating the following error message:

Log Name:      Application
Source:        Group Policy Local Users and Groups
Date:          13/02/2012 11:23:34
Event ID:      4098

Description:
The computer ‘Administrator (built-in)’ preference item in the ‘Member_Server_Policy {AF5D1786-0EBF-4C78-BEAA-581F35735016}’ Group Policy object did not apply because it failed with error code ‘0x80070524 The specified account already exists.’ This error was suppressed.

After some initial troubleshooting I opted to modify the way the rename policy was setup by using a more traditional method for changing the administrator user account name

Open Group Policy Object Editor for the policy you want to use to rename the Administrator account, click Computer Configuration, click Windows Settings, click Security Settings, click Local Policies, and then click Security Options. Change the setting titled ‘Accounts: Rename administrator account.’

Categories
Windows 2008

AD DS : Sysvol Replication Optimistaions (DFSR and Central Store)

AD DS : Sysvol Replication Optimistaions (DFSR and Central Store)

You may not be aware that new functionality is built-in to Windows 2008 and Windows 2008 R2 that can help optimise SYSVOL replication in your environment. These technologies are DFSR repliction and the PolicyDefinitions Central Store.

Implementing the PolicyDefinitions Central Store

This change is a simple quick-win, tim implement follow these steps:

  1. Create a PolicyDefinitions folder under \\<domain_controller_fqdn>\SYSVOL\<domain_fqdn>\Policies (for example \\DC1.domain.local\domain.local\Policies\PolicyDefinitions)
  2. Copy the contents of C:\Windows\PolicyDefinitions to this new folder
  3. Verfy the Central Store in now in use in a Group Policy editor window, select the Administartive Templates tree, you should see “Administrative Templates: Policy definitions (ADMX files) retrieved from the central store.

Implementing DFSR Replication

  1. Check SYSVOL status on all Domain Controllers (check the value of the following registry key: Reg Query HKLM\System\CurrentControlSet\Services\Netlogon\Parameters /s (SysvolReady should be set to ‘1’)
  2. Check that Domain Controllers are replicating properly; repadmin /showreps and repadmin /replsum
  3. From the PDC FSMO role holder execute: dfsrmig /SetGlobalState 1
  4. Wait for all domain controllers to report they have reach the ‘PREPARED’ state: dfsrmig /getMigrationState
  5. Again, check replication; repadmin /showreps and repadmin /replsum
  6. From the PDC FSMO role holder execute: dfsrmig /setGlobalState 2
  7. Wait for all domain controllers to report they have reach the ‘REDIRECTED’ state: dfsrmig /getMigrationState
  8. Again, check replication; repadmin /showreps and repadmin /replsum
  9. From the PDC FSMO role holder execute: dfsrmig /setGlobalState 3 (NOTE from here-on-in you can’t roll-back this change)
  10. Wait for all domain controllers to report they have reach the ‘ELIMINATED’ state: dfsrmig /getMigrationState

More information about the process available here: http://technet.microsoft.com/en-us/library/dd640019(v=ws.10).aspx

Categories
Exchange Server 2010

Exchange 2010 : Useful Logs

Exchange 2010 : Useful Logs

The following logs on Exchnage 2010 CAS/HT and Mailbox Servers (logs vary between role division) are available to aid troubleshooting:

C:\Program Files\Microsoft\Exchange Server\V14\Logging\AddressBook Service\AddressBook*
C:\Program Files\Microsoft\Exchange Server\V14\Logging\Imap4\IMAP4*
C:\Program Files\Microsoft\Exchange Server\V14\Logging\Pop3\POP3*
C:\Program Files\Microsoft\Exchange Server\V14\Logging\RPC Client Access\RCA*
C:\inetpub\logs\LogFiles\W3SVC1\u_ex*

Categories
Windows 2008

Windows Server: Folder Redirection – Migration

Windows Server: Folder Redirection – Migration

I recently had to migrate a load redirected folders from one server to NetApp CIFS vFiler. The redirected folders were being access via a DFS NameSpace, had Exclusive Rights for users and contained up to 20GB per user, with some files having specific ACL’s that prevented even the SYSTEM account from accessing them! Needless to say this wasn’t a simple process.

Firstly let me point out a simple way of doing this in a smaller environment. If you update your Group Policy Folder Redirection Options  (or apply a new policy with higher precedence), if the Redirection Policy is configured to “Move the contents of xxxx to the new location” then at logon the users files will be moved to the new location…. an automated migration that works well for small amounts of data.

With up to 20GB of data per user the above solution simply wasn’t going to cut it. This would have added hours of delays for users logging on. We opted to pre stage the data, which meant we had to disable the “Move the contents of xxxx to the new location” for each folder we were pre-staging – this is an important step! You should allow a week or two for all users to get this change before proceeding with your migration.

Next problem, how to pre-stage the data! Well RoboCopy failed miserably due to the ACL’s and exclusive rights, so we used a tool called SecureCopy which worked really well – to a point; open files, and files with specific ACL’s which users had set were not pre-staged. The number of these files totalled around 2,300!

We needed to pre-stage these files are many of them were current, business related documents… welcome back to the fight RoboCopy! We deployed a script (below) to run at user logon, as the user, that would copy the missing files (using /MIR to mirror the folder contents) from the Windows box to the NetApp CIFS. This ran for a few days to minimise the amount of missing data when we ‘flipped the switch.’

Finally, with the data pre-staged we change the GPO folder redirection options to point to the vFiler shares. The RoboCopy script was still running, so when users logged on they got the migrated, pre-staged redirected folders that were up-to-date 🙂

All-in-all the process took a few days (weeks if you include the initial step to disable “Move folder contents…”) but the end result was minimal interruption to users – which in the world of infrastructure is a good thing.

In short, the process was:

  1. Disable “Move the contents of xxxx to the new location” for each redirected folder
  2. Wait a week or two!
  3. Use SecureCopy to pre-stage most of the data
  4. Deploy a RoboCopy user logon script to mirror the user data on the old Windows box to the CIFS vFiler folder containing the users’ data.
  5. Wait a few days to minimise the amount of un-synched data
  6. Change the folder redirection policy / deploy a new GPO with higher precedence

{code lang:php title:”Copy Script” lines:false hidden:false}Option Explicit
On Error Resume Next
‘———————–
‘——– Define Variables
‘———————–
Dim objNetwork, strUserName, fso, objFSO, objFolder, objFiles, fldName, checkFile, logFile, logPath
Dim srcSrv, myDocShare, myFaveShare, myDeskShare
Dim dstSrv, myDocDst, myFaveDst, myDeskDst

Set objNetwork = WScript.CreateObject(“WScript.Network”)
Set objFSO = CreateObject(“Scripting.FileSystemObject”)

‘———————–
‘——– Obtain User Logon Name
‘———————–
strUserName = objNetwork.UserName
‘Share path to create log files for each RoboCopy opperation
logPath = “\\SERVER\Share\Folder\”

‘———————–
‘——– Define redirected folders to check
‘———————–
‘Source
srcSrv = “\\Server or DFS NameSpace Root\”
‘Destination
dstSrv = “\\Server or DFS Name Space Root\”

‘Source Share Paths, add more if required, be sure to define variables at the top of the script
‘and destination paths below
myDocShare = “MyDocuments\” & strUserName
myFaveShare = “MyFavourites\” & strUserName
myDeskShare = “MyDesktop\” & strUserName
‘Destination Share Paths
myDocDst = “MyDocuments\” & strUserName
myFaveDst = “MyFavourites\” & strUserName
myDeskDst = “MyDesktop\” & strUserName

‘———————–
‘——– Check User Has Not Been Processed Already
‘———————–
If NOT(objFSO.FileExists(dstSrv & myDocShare & “\SharesMirrored”)) Then
        ‘———————–
        ‘——– Check Redirected Folders, add any additional shares created above
        ‘———————–
        CheckFolder(myDocShare)
        CheckFolder(myFaveShare)
        CheckFolder(myDeskShare)
        
        ‘———————–
        ‘——– Subs/Functions
        ‘———————–
        Sub CheckFolder(fldName)
            Dim objShell, logName
         Set objShell = CreateObject(“WScript.Shell”)
         ‘Hide and run all copies async.
            
         If inStr(fldName,”Documents”) > 1 Then
             LogName = “Docs”
            ElseIf inStr(fldName,”Desktop”) > 1 Then
                    LogName = “Desktop”
            ElseIf inStr(fldName,”Favourites”) > 1 Then
                    LogName = “Faves”
            End If
            
            ‘Perform Validation
            If strUserName = “” or srcSrv = “” or fldName = “” or dstSrv = “” Then
                ‘Do Nothing
         Else
             objShell.Run “robocopy.exe ” & Chr(34) & srcSrv & fldName & chr(34) & ” ” _
                 & Chr(34) & dstSrv & fldName & Chr(34) & ” /COPY:DAT /E /XX /XO /R:1 /W:5 /LOG:” & chr(34) _
                 & logPath & strUserName & “-” & logName & “.txt”,0,false
            End If
        End Sub
                
        ‘———————-
        ‘——– Create Log File
        ‘———————-
        ‘Set checkFile = objFSO.CreateTextFile(dstSrv & myDocShare & “\SharesMirrored”, True)
Else
        Wscript.Quit
End If{/code}