Categories
ConfigMgr

OSD Wizard Updates (0.95 release)

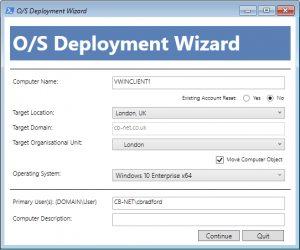
I’ve worked my way through a series of additional features for OSD Wizard (a ConfigMgr/ SCCM Task Sequence front-end/ modern HTA) this week – namely the introduction of run-time “modes” – Default, Set-Description, ExportOU, Test. With these modes you can now:

  • Set AD Computer Account description mid-Task Sequence using OSD Wizard/ Web Service as opposed to using a separate script with RunAs credentials
  • Perform a compatible OU export using the OSD Wizard script itself (and automate/ schedule this if so desired), rather than performing this manually
  • Fully test OSD Wizard outside of a Task Sequence environment (without the need for the SMS TS Environment COM Object) – including the ability to spoof platform information/ properties.

Grab a copy of the latest release here: https://gitlab.com/chrismbradford/osd-wizard
Categories
ConfigMgr

Introducing OSD Wizard – A PowerShell Front-End / HTA for ConfigMgr Task Sequences

When I first started working with SCCM/ ConfigMgr a few years ago I ran into several issues with upstream teams trying to deploy Task Sequences to devices that were untested (i.e. there were no drivers), power was not plugged in, the user supplied hostname was duplicated in target domain etc. This generated unnecessary Incidents, and delays in getting devices out to users. I became increasingly frustrated at the lack of ConfigMgr built-in capabilities to address these issues, so I turned to vbScript to write a HTA / front-end to address these issues. vbScript is now, several years later, a dying technology, so over time I have re-written the vbScript/ HTA in PowerShell, leveraging WPF and XAML to generate a user interface.

OSDWizard UI

OSD Wizard is a PowerShell script with a WPF/ XAML-based UI built for use within System Center Configuration Manager (SCCM / ConfigMgr) Task Sequences – it has two key purposes, the second of which is optional:

  1. Reduce “human error” factors during early stages of Operating System Deployment
  2. Enable location (network) derived automation for multi-language environments

You can read through the details of the project, download and review the source code (and even contribute!) via GitLab, here: https://gitlab.com/chrismbradford/osd-wizard

Categories
ConfigMgr

ConfigMgr Windows 10 Enterprise 1703 Stuck at “Just a moment”

I ran into an issue when testing Windows 10 Enterprise 1703  in the lab, when deploying via ConfigMgr Current Branch – essentially after image deployment the machine would reboot and just show a blue screen with “just a moment.”

I came across this post which led to the solution – a modification to the Unattend.xml:

<?xml version="1.0" encoding="utf-8"?>
<unattend xmlns="urn:schemas-microsoft-com:unattend">
    <settings pass="oobeSystem">
        <component name="Microsoft-Windows-Shell-Setup" processorArchitecture="amd64" publicKeyToken="31bf3856ad364e35" language="neutral" versionScope="nonSxS" xmlns:wcm="http://schemas.microsoft.com/WMIConfig/2002/State" xmlns:xsi="http://www.w3.org/2001/XMLSchema-instance">
            <OOBE>
                <HideEULAPage>true</HideEULAPage>
                <HideLocalAccountScreen>true</HideLocalAccountScreen>
                <HideOEMRegistrationScreen>true</HideOEMRegistrationScreen>
                <HideOnlineAccountScreens>true</HideOnlineAccountScreens>
                <HideWirelessSetupInOOBE>true</HideWirelessSetupInOOBE>
                <NetworkLocation>Work</NetworkLocation>
                <ProtectYourPC>1</ProtectYourPC>
                <SkipMachineOOBE>true</SkipMachineOOBE>
                <SkipUserOOBE>true</SkipUserOOBE>
            </OOBE>
        </component>
        <component name="Microsoft-Windows-Shell-Setup" processorArchitecture="x86" publicKeyToken="31bf3856ad364e35" language="neutral" versionScope="nonSxS" xmlns:wcm="http://schemas.microsoft.com/WMIConfig/2002/State" xmlns:xsi="http://www.w3.org/2001/XMLSchema-instance">
            <OOBE>
                <HideEULAPage>true</HideEULAPage>
                <HideLocalAccountScreen>true</HideLocalAccountScreen>
                <HideOEMRegistrationScreen>true</HideOEMRegistrationScreen>
                <HideOnlineAccountScreens>true</HideOnlineAccountScreens>
                <HideWirelessSetupInOOBE>true</HideWirelessSetupInOOBE>
                <NetworkLocation>Work</NetworkLocation>
                <ProtectYourPC>1</ProtectYourPC>
                <SkipMachineOOBE>true</SkipMachineOOBE>
                <SkipUserOOBE>true</SkipUserOOBE>
            </OOBE>
        </component>
    </settings>
    <cpi:offlineImage cpi:source="wim:c:/temp/install.wim#Windows 10 Enterprise Evaluation" xmlns:cpi="urn:schemas-microsoft-com:cpi" />
</unattend>


Categories
ConfigMgr

ConfigMgr : Adding KMDF 1.11 (KB2685811) to Build and Capture Taks Sequences

Download the KMDF 1.11 driver for X86 and X64 architectures using this link: https://support.microsoft.com/en-us/kb/2685811

Extract the MSU files using the commands:

mkdir C:\Temp
mkdir C:\Temp\Windows6.1-KB2685811-x86\"
mkdir C:\Temp\Windows6.1-KB2685811-x64\"

expand –f:* kmdf-1.11-Win-6.1-x86.msu "C:\\Temp\Windows6.1-KB2685811-x86\\"
expand –f:* kmdf-1.11-Win-6.1-x64.msu "C:\\Temp\\Windows6.1-KB2685811-x64\\"

Create a ConfigMgr package (not Application) as indictaed below:

Package name: Microsoft KMDF 1.11 Hotfix

Folder structure / contents:
\X86\Windows6.1-KB2685811-x86.cab (extracted from downloaded MSU, as above)
\X64\Windows6.1-KB2685811-x64.cab (extracted from downloaded MSU, as above)

Ensure content for this package is distributed to all of your DPs prior to continuing.

Now we will modify your “Build and Capture” Task Sequence.

Create a new folder/ group just prior to the “Setup Windows and Configuratipn Manager” task:

kmdf

Below, I have detailed actions for x64 architecture, replace X64 with X86 for 32-bit.

This group will contain two actions:

Run Command Line: Create Temp Folder
Command: cmd.exe /c mkdir %OSDSystemDrive%\Temp
Package: No Package

Run Command Line: Inject KMDF 1.11 x64
Command: cmd.exe /c X:\windows\system32\dism.exe /ScratchDir:%OSDSystemDrive%\Temp /Image:%OSDSystemDrive%\ /Add-Package /PackagePath:%_SMSTSMDataPath%\Packages\M010038D\X64\Windows6.1-KB2685811-x64.cab
Package: Microsoft KMDF 1.11 Hotfix

This driver will now be injected automatically everytime you re-create your master image via the Buld and Capture Task Sequence.

Categories
ConfigMgr

ConfigMgr : Multilanguage Office 2016 Click-to-Run (C2R)

Download office using the following configuration.xml file – make sure you include ALL languages you will want to use across devices in your environment – don’t worry though as we’ll use this to stage more streamlined versions as required – the idea here is that you create one source to rule them all – i.e. a single source with all language packs pre-downloaded. More info on how to download here: http://www.cb-net.co.uk/microsoft-articles/34-configmgr/2118-configmgr-deploying-office-2016-click-to-run-during-osd

<Configuration>
  <Add OfficeClientEdition="32" Branch="Current">
    <Product ID="O365ProPlusRetail">
      <Language ID="en-us" />
	  <Language ID="fr-fr" />
	  <Language ID="de-de" />
	  <Language ID="es-es" />
	  <Language ID="pt-pt" />
	  <Language ID="pl-pl" />
	  <Language ID="ro-ro" />
	  <Language ID="ru-ru" />
	  <Language ID="tr-tr" />
    </Product>
  </Add>
  <!--  <Updates Enabled="TRUE" Branch="Current" /> -->
  <!--  <Display Level="None" AcceptEULA="TRUE" />  -->
  <!--  <Property Name="AUTOACTIVATE" Value="1" />  -->
</Configuration>

Now create this dynamic PowerShell script – we’ll call this during OSD or package deployment specifying a argument for the secondary language you need. This script should be named “_Install.ps1” and should be in the root of the package you create, along with the contents of the downloaded Office C2R.

Param(
  [string]$language
)
# Build dynamic XML file text - needed as without specifying the SourcePath Office install hangs
$currentLocation = Split-Path -Parent $MyInvocation.MyCommand.Path;
If ($language) {
$text = @"
<Configuration>
  <Add SourcePath=`"$currentLocation`" OfficeClientEdition=`"32`" Branch=`"Current`">
    <Product ID=`"O365ProPlusRetail`">
      <Language ID=`"en-us`" />
	  <Language ID=`"$language`" />
    </Product>
  </Add>
  <Updates Enabled=`"TRUE`" Branch=`"Current`" />
  <Display Level=`"None`" AcceptEULA=`"TRUE`" />
</Configuration> 
"@
}
Else {
$text = @"
<Configuration>
  <Add SourcePath=`"$currentLocation`" OfficeClientEdition=`"32`" Branch=`"Current`">
    <Product ID=`"O365ProPlusRetail`">
      <Language ID=`"en-us`" />
    </Product>
  </Add>
  <Updates Enabled=`"TRUE`" Branch=`"Current`" />
  <Display Level=`"None`" AcceptEULA=`"TRUE`" />
</Configuration> 
"@
}
# Output XML file
$text | Out-File 'dynamic_configuration.xml'
# Execute setup, using dynamic XML file
start-process -wait -WindowStyle hidden setup.exe -argumentlist "/configure dynamic_configuration.xml"

You can call this from within a ConfigMgr 2012 R2 SP1 Task Sequence using the “Run PowerShell Script” step, configured as below – note I use a TS variable to pass “fr-fr” or “de-de” to the dynamic XML file creation. You could simply type the language needed and work out the logic to get the right package to the right machines a different way.

  • Name: Run Script: Install Microsoft Office C2R (MUI)
  • Script name: _Install.ps1
  • Parameters: -language %OSDSecondaryUILanguage%
  • Execution Policy: Bypass
Categories
ConfigMgr

ConfigMgr : Deploying Office 2016 Click to Run during OSD

Click to run offers a relatively pain-free way of packaging Office 2016, but it does present some challenges when deploying via SCCM or similar enterprise tools. Follow the steps below to enable deployment of Office 365 via SCCM 2012 – I’ve tested this against Windows 7, 8.1 and 10 – YMMV.


1. Download and install the Office 2016 Deployment Tool from: https://www.microsoft.com/en-us/download/details.aspx?id=49117


2. In the same directory as your new setup.exe create new file named configuration.xml – contents:

<Configuration>
  <Add OfficeClientEdition="32" Branch="Current">
    <Product ID="O365ProPlusRetail">
      <Language ID="en-us" />
    </Product>
  </Add>
  <!--  <Updates Enabled="TRUE" Branch="Current" /> -->
  <!--  <Display Level="None" AcceptEULA="TRUE" />  -->
  <!--  <Property Name="AUTOACTIVATE" Value="1" />  -->
</Configuration>

3. Download Office 2016 using a command prompt in the Office 2016 Deployment Tool directory, via the following command: setup.exe /download configuration.xml


4. Within SCCM create a new package or application from contents of new “Office” folder within the directory you executed the command from


5. Create a PowerShell script “_Install.ps1” within the root folder of the Office 2016 package/application – contents below – and call this scritp from a “Run PowerShell Script” task within your Task Sequence.

# Build dynamic XML file text - needed as without specifying the SourcePath Office install hangs
$currentLocation = Split-Path -Parent $MyInvocation.MyCommand.Path;
$text = @"
<Configuration>
  <Add SourcePath=`"$currentLocation`" OfficeClientEdition=`"32`" Branch=`"Current`">
    <Product ID=`"O365ProPlusRetail`">
      <Language ID=`"en-us`" />
    </Product>
  </Add>
  <Updates Enabled=`"TRUE`" Branch=`"Current`" />
  <Display Level=`"None`" AcceptEULA=`"TRUE`" />
  <!--  <Property Name=`"AUTOACTIVATE`" Value=`"1`" />  -->
</Configuration> 
"@
# Output XML file
$text | Out-File 'dynamic_configuration.xml'
# Execute setup, using dynamic XML file
start-process -wait -WindowStyle hidden setup.exe -argumentlist "/configure dynamic_configuration.xml"
Categories
ConfigMgr

ConfigMgr : Windows PE initialization failed with error code 0x80220014

When using System Center Configuration Manager 2012 R2 SP1 and Windows ADK for Windows 10, version 1511 there is a bug which will prevent a production OS booting into a Windows PE environment successfully – you’ll be presented, as I was, with the following error:

Windows PE initialization failed with error code 0x80220014

For now, use the RTM version of the Windows ADK for Windows 10, direct download link here: http://download.microsoft.com/download/8/1/9/8197FEB9-FABE-48FD-A537-7D8709586715/adk/adksetup.exe

More details here: http://blogs.technet.com/b/configmgrteam/archive/2015/11/20/issue-with-the-windows-adk-for-windows-10-version-1511.aspx

Be warned though, this will break DaRT image creation – you’ll get the error below when using the slightly older Windows 10 ADK:

Set-DartImage : Error applying Dart Tools to the image mounted to:

'<image path>'. Package is not applicable: 'C:\Program Files(x86)\Windows Kits\10\Assessment and Deployment Kit\Windows Preinstallation Environment\amd64\WinPE_OCs\WinPE-FMAPI.cab'..

At X:\Dart10\DaRT10\x64\DaRT10.ps1:86 char:11

+ $config | Set-DartImage -Path $TempMountPath

+           ~~~~~~~~~~~~~~~~~~~~~~~~~~~~~~~~~~

    + CategoryInfo          : InvalidOperation: (C:\Program File...WinPE-FMAPI.cab:FileInfo) [Set-DartImage], DismPackageNotApplicableException

    + FullyQualifiedErrorId : WindowsPackageNotApplicable,Microsoft.Dart.Commands.SetDartImageCommand


Categories
ConfigMgr

ConfigMgr : Are you cleaning up your WIMs?

In a quest to reduce WIM size I came across a couple of tricks that gave me a ~25% reduction (YMMV) in my master image size for a Windows 8.1 build.

  •     Without these steps my base images was 4,796,105 KB
  •     After these steps my base images was 3,732,024 KB

Note that both of the below tricks also work on Windows 10 task sequences, but will not work on Windows 7 task sequences without the following update: https://support.microsoft.com/en-us/kb/2852386


Trick 1: DISM Cleanup-image and ResetBase

The first trick is a simple “Run Command Line” task that you can build into a a Task Sequence, just before you reboot back into Windows PE

Command line: Dism.exe /online /Cleanup-Image /StartComponentCleanup /ResetBase

DISM Cleanup

Trick 2: Disk Cleanup Utility

All credit for this goes to the following article: http://stealthpuppy.com/cleaning-up-and-reducing-the-size-of-your-master-image/

For this you will need to create a package that contains a single file names “_ImageCleanup.cmd” the contents of this file should be as below:

REG ADD "HKLM\SOFTWARE\Microsoft\Windows\CurrentVersion\Explorer\VolumeCaches\Active Setup Temp Folders" /v StateFlags0100 /d 2 /t REG_DWORD /f
REG ADD "HKLM\SOFTWARE\Microsoft\Windows\CurrentVersion\Explorer\VolumeCaches\BranchCache" /v StateFlags0100 /d 2 /t REG_DWORD /f

REG ADD "HKLM\SOFTWARE\Microsoft\Windows\CurrentVersion\Explorer\VolumeCaches\Downloaded Program Files" /v StateFlags0100 /d 2 /t REG_DWORD /f

REG ADD "HKLM\SOFTWARE\Microsoft\Windows\CurrentVersion\Explorer\VolumeCaches\GameNewsFiles" /v StateFlags0100 /d 2 /t REG_DWORD /f

REG ADD "HKLM\SOFTWARE\Microsoft\Windows\CurrentVersion\Explorer\VolumeCaches\GameStatisticsFiles" /v StateFlags0100 /d 2 /t REG_DWORD /f

REG ADD "HKLM\SOFTWARE\Microsoft\Windows\CurrentVersion\Explorer\VolumeCaches\GameUpdateFiles" /v StateFlags0100 /d 2 /t REG_DWORD /f

REG ADD "HKLM\SOFTWARE\Microsoft\Windows\CurrentVersion\Explorer\VolumeCaches\Internet Cache Files" /v StateFlags0100 /d 2 /t REG_DWORD /f

REG ADD "HKLM\SOFTWARE\Microsoft\Windows\CurrentVersion\Explorer\VolumeCaches\Memory Dump Files" /v StateFlags0100 /d 2 /t REG_DWORD /f

REG ADD "HKLM\SOFTWARE\Microsoft\Windows\CurrentVersion\Explorer\VolumeCaches\Offline Pages Files" /v StateFlags0100 /d 2 /t REG_DWORD /f

REG ADD "HKLM\SOFTWARE\Microsoft\Windows\CurrentVersion\Explorer\VolumeCaches\Old ChkDsk Files" /v StateFlags0100 /d 2 /t REG_DWORD /f

REG ADD "HKLM\SOFTWARE\Microsoft\Windows\CurrentVersion\Explorer\VolumeCaches\Previous Installations" /v StateFlags0100 /d 2 /t REG_DWORD /f

REG ADD "HKLM\SOFTWARE\Microsoft\Windows\CurrentVersion\Explorer\VolumeCaches\Recycle Bin" /v StateFlags0100 /d 2 /t REG_DWORD /f

REG ADD "HKLM\SOFTWARE\Microsoft\Windows\CurrentVersion\Explorer\VolumeCaches\Service Pack Cleanup" /v StateFlags0100 /d 2 /t REG_DWORD /f

REG ADD "HKLM\SOFTWARE\Microsoft\Windows\CurrentVersion\Explorer\VolumeCaches\Setup Log Files" /v StateFlags0100 /d 2 /t REG_DWORD /f

REG ADD "HKLM\SOFTWARE\Microsoft\Windows\CurrentVersion\Explorer\VolumeCaches\System error memory dump files" /v StateFlags0100 /d 2 /t REG_DWORD /f

REG ADD "HKLM\SOFTWARE\Microsoft\Windows\CurrentVersion\Explorer\VolumeCaches\System error minidump files" /v StateFlags0100 /d 2 /t REG_DWORD /f

REG ADD "HKLM\SOFTWARE\Microsoft\Windows\CurrentVersion\Explorer\VolumeCaches\Temporary Files" /v StateFlags0100 /d 2 /t REG_DWORD /f

REG ADD "HKLM\SOFTWARE\Microsoft\Windows\CurrentVersion\Explorer\VolumeCaches\Temporary Setup Files" /v StateFlags0100 /d 2 /t REG_DWORD /f

REG ADD "HKLM\SOFTWARE\Microsoft\Windows\CurrentVersion\Explorer\VolumeCaches\Temporary Sync Files" /V StateFlags0100 /d 2 /t REG_DWORD /f

REG ADD "HKLM\SOFTWARE\Microsoft\Windows\CurrentVersion\Explorer\VolumeCaches\Thumbnail Cache" /v StateFlags0100 /d 2 /t REG_DWORD /f

REG ADD "HKLM\SOFTWARE\Microsoft\Windows\CurrentVersion\Explorer\VolumeCaches\Update Cleanup" /v StateFlags0100 /d 2 /t REG_DWORD /f

REG ADD "HKLM\SOFTWARE\Microsoft\Windows\CurrentVersion\Explorer\VolumeCaches\Upgrade Discarded Files" /v StateFlags0100 /d 2 /t REG_DWORD /f

REG ADD "HKLM\SOFTWARE\Microsoft\Windows\CurrentVersion\Explorer\VolumeCaches\User file versions" /v StateFlags0100 /d 2 /t REG_DWORD /f

REG ADD "HKLM\SOFTWARE\Microsoft\Windows\CurrentVersion\Explorer\VolumeCaches\Windows Defender" /v StateFlags0100 /d 2 /t REG_DWORD /f

REG ADD "HKLM\SOFTWARE\Microsoft\Windows\CurrentVersion\Explorer\VolumeCaches\Windows Error Reporting Archive Files" /v StateFlags0100 /d 2 /t REG_DWORD /f

REG ADD "HKLM\SOFTWARE\Microsoft\Windows\CurrentVersion\Explorer\VolumeCaches\Windows Error Reporting Queue Files" /v StateFlags0100 /d 2 /t REG_DWORD /f

REG ADD "HKLM\SOFTWARE\Microsoft\Windows\CurrentVersion\Explorer\VolumeCaches\Windows Error Reporting System Archive Files" /v StateFlags0100 /d 2 /t REG_DWORD /f

REG ADD "HKLM\SOFTWARE\Microsoft\Windows\CurrentVersion\Explorer\VolumeCaches\Windows Error Reporting System Queue Files" /v StateFlags0100 /d 2 /t REG_DWORD /f

REG ADD "HKLM\SOFTWARE\Microsoft\Windows\CurrentVersion\Explorer\VolumeCaches\Windows ESD installation files" /v StateFlags0100 /d 2 /t REG_DWORD /f

REG ADD "HKLM\SOFTWARE\Microsoft\Windows\CurrentVersion\Explorer\VolumeCaches\Windows Upgrade Log Files" /v StateFlags0100 /d 2 /t REG_DWORD /f

IF EXIST %SystemRoot%\SYSTEM32\cleanmgr.exe START /WAIT cleanmgr /sagerun:100

Implement within your Task Sequence as below:

Disk Cleanup Step

Categories
ConfigMgr

ConfigMgr : “Cannot edit the object, which is in use by ” at Site ”.”

I ran into some issue with the ConfigMgr console in a development environment and the console itself bombed-out – at the time I had a Task Sequence open. Upon re-opening the console and trying to edit the Task Sequence I was presented with the following error:

"Cannot edit the object, which is in use by '<user>' at Site '<site>'."

To resolve, you’ll need to open a SQL Server Management Studio connection to your site database. Now execute the following commands to review current locks in your environment:

USE CM_<Site Code>

SELECT * from SEDO_LockState where LockStateID <> 0

Once the Lock ID has been identified, remove it using the following command:

DELETE from SEDO_LockState where LockID = '<lock ID>'
Categories
ConfigMgr

ConfigMgr : Windows 7 x64 OSDComputerName Ignored

We’ve been tetsing a 64-bit build of Windows 7 SP1, that includes IE 10. SCCM 2012 R2 CU1 performs both the Build and Capture Task Sequence alongside all Deployments of the ‘golden image’ to client devices.

The symptoms of this issue were simple, all “Deploy” Task Sequences were failing – on closer inspection it was clear that the machine had not joined the domain, and it had not used the hostname as defined in the OSDComputerName Task Sequence Variable – in fact the machine was using the name of the machine that we used to perform the golden image creation under the Build/Capture Task Sequence!

Having reviewed the sysprep logs on the client there was an error; SYSPRP LaunchDll:Could not load DLL C:\Windows\SysWOW64\iesysprep.dll[gle=0x000000c1]

This was surprising as the Build and Capture Task Sequence was completing successfully, every time.